
Deployment Guide

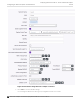
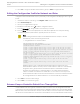
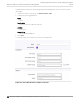
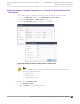
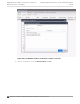
Table Of Contents
- Table of Contents
- Preface
- About Extreme Campus Controller Deployment
- Configuring DHCP, NPS, and DNS Services
- Centralized Site with a Captive Portal
- Centralized Site with AAA Network
- Deploying a Mesh Network
- Configuring an External NAC Server for MBA and AAA Authentication
- Manage RADIUS Servers for User Authentication
- External Captive Portal on a Third-Party Server
- Access Control Rule Admin Portal Access
- Deploying Centralized Web Authentication
- Deploying ExtremeCloud IQ - SE as an External Captive Portal
- Deployment Strategy
- Configuring an External Captive Portal Network
- Editing the Configuration Profile for Network and Roles
- Extreme Campus Controller Default Pass-Through Rule
- Adding Extreme Campus Controller as a Switch to ExtremeCloud IQ - Site Engine
- Editing the Unregistered Policy on ExtremeCloud IQ - Site Engine
- Editing the ExtremeCloud IQ - Site Engine Profile for Policy and Location-Based Services
- Deploying an ExtremeGuest Captive Portal
- Deploying Client Bridge
- Deploying an Availability Pair
- Deploying Universal APs
- Extreme Campus Controller Pair with ExtremeLocation and AirDefense
- ECP Local Authentication
- PHP External Captive Portal, Controller’s Firewall Friendly API
- Index

Configuring an External Captive Portal Network
Configuring an External Captive Portal network.
1. Go to Configure > Networks > WLANs > Add and configure the following parameters:
Network Name
Guest
SSID
Guest
Auth Type
Open
Enable Captive Portal
Check this option and specify the following parameters:
Captive Portal Type
External
ECP URL
(http/https)://nac1.extremenetworks.com
FQDN should be resolvable by connecting end systems via DNS.
Note
Walled Garden rules are not required for this network. The process of enabling a
captive portal on the network automatically creates rules allowing DNS, DHCP, and
redirection rules. However, if users are unable to connect to the network, consider
creating specific DNS and DHCP Allow rules as a Walled Garden configuration.
When you enable Captive Portal on a WLAN Extreme Campus Controller automatically builds
the role and redirect rules required for captive portal based on the Network Name configured in
the WLAN.
Identity/ Shared Secret
Not required with integration with Extreme Control.
Used when building a back-end captive portal server to integrate with the system. Extreme
Campus Controller sends the Identity/Shared Secret and receives a response token.
Use HTTPS
Select this option if you want Extreme Campus Controller to attempt to redirect SSL trac.
Best Practice: Use https:// in the ECP URL and de-select this option.
Send Successful Login To
Original Destination. Or, enter the redirection URL here.
MAC-based authentication (MBA)
Enable and configure the following parameters:
MBA Timeout Role
Enterprise User
Deploying ExtremeCloud IQ - SE as an External Captive
Portal Configuring an External Captive Portal Network
Extreme Campus Controller Deployment Guide for version 5.46.03 151