
Deployment Guide
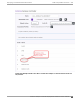
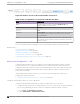

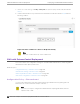


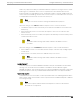
Table Of Contents
- Table of Contents
- Preface
- About Extreme Campus Controller Deployment
- Configuring DHCP, NPS, and DNS Services
- Centralized Site with a Captive Portal
- Centralized Site with AAA Network
- Deploying a Mesh Network
- Configuring an External NAC Server for MBA and AAA Authentication
- Manage RADIUS Servers for User Authentication
- External Captive Portal on a Third-Party Server
- Access Control Rule Admin Portal Access
- Deploying Centralized Web Authentication
- Deploying ExtremeCloud IQ - SE as an External Captive Portal
- Deployment Strategy
- Configuring an External Captive Portal Network
- Editing the Configuration Profile for Network and Roles
- Extreme Campus Controller Default Pass-Through Rule
- Adding Extreme Campus Controller as a Switch to ExtremeCloud IQ - Site Engine
- Editing the Unregistered Policy on ExtremeCloud IQ - Site Engine
- Editing the ExtremeCloud IQ - Site Engine Profile for Policy and Location-Based Services
- Deploying an ExtremeGuest Captive Portal
- Deploying Client Bridge
- Deploying an Availability Pair
- Deploying Universal APs
- Extreme Campus Controller Pair with ExtremeLocation and AirDefense
- ECP Local Authentication
- PHP External Captive Portal, Controller’s Firewall Friendly API
- Index

5. On the Cisco® ISE server, go to Authorization > Authorization Profile.
6. Create an allow Authorization Profile that is assigned to the user after the user is authenticated
through the captive portal.
Figure 51: Allow Authorization Profile
• In the Common Tasks section, select Airespace ACL Name. The field must match the final
Authenticated Role on Extreme Campus Controller.
• In the Attribute Details section, the Cisco® ISE server returns: Access Type =
ACCESS_ACCEPT, and Airespace-ACL-Name = x where x is the name of the authenticated
role on Extreme Campus Controller (AH-ALLOW).
Deploying Centralized Web Authentication
CWA Server Configuration — ISE
Extreme Campus Controller Deployment Guide for version 5.46.03 135