
Deployment Guide
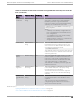
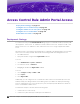
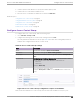
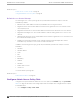
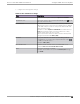
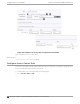
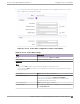

Table Of Contents
- Table of Contents
- Preface
- About Extreme Campus Controller Deployment
- Configuring DHCP, NPS, and DNS Services
- Centralized Site with a Captive Portal
- Centralized Site with AAA Network
- Deploying a Mesh Network
- Configuring an External NAC Server for MBA and AAA Authentication
- Manage RADIUS Servers for User Authentication
- External Captive Portal on a Third-Party Server
- Access Control Rule Admin Portal Access
- Deploying Centralized Web Authentication
- Deploying ExtremeCloud IQ - SE as an External Captive Portal
- Deployment Strategy
- Configuring an External Captive Portal Network
- Editing the Configuration Profile for Network and Roles
- Extreme Campus Controller Default Pass-Through Rule
- Adding Extreme Campus Controller as a Switch to ExtremeCloud IQ - Site Engine
- Editing the Unregistered Policy on ExtremeCloud IQ - Site Engine
- Editing the ExtremeCloud IQ - Site Engine Profile for Policy and Location-Based Services
- Deploying an ExtremeGuest Captive Portal
- Deploying Client Bridge
- Deploying an Availability Pair
- Deploying Universal APs
- Extreme Campus Controller Pair with ExtremeLocation and AirDefense
- ECP Local Authentication
- PHP External Captive Portal, Controller’s Firewall Friendly API
- Index

3. Create a Captive Portal definition or specify the Default captive portal.
4. Create an Access Control Rule for Admin access.
5. Place the Access Control Rule for Admin access within the Rules List.
Related Topics
Configure Access Control Group on page 113
Configure Admin Access Policy Role on page 114
Configure Access Control Rule on page 116
Define Rule Precedence on page 119
Default Access Control Groups on page 114
Configure Access Control Group
To configure an Access Control Group, take the following steps:
1. Go to Onboard > Groups > Add.
2. Configure the following Access Control Group settings and select Save.
The entry parameters depend on the Group Type.Table 14 describes each setting and provides an
example value configured for the Access Control Group.
Table 14: Access Control Group Settings
Field Description
Name Group name. Example: Captive Portal Admins
Description Description of the group. Allows Self Registration.
Group Type Criteria by which the accounts are grouped. Example: End System —
MAC
Group Mode For End System LDAP User Groups only — Specify whether to match
any or match all of the LDAP attributes. Valid values are:
• Match All
• Match Any
Example: Match Any
Group Entries A list of entries for the Group Type.
Example: End System — MAC. Use the Search field to search for an
entry.
Figure 38: Access Control Group Configuration: Captive Portal Admins
Next, review the Default Access Control Groups, then we will create an Admin access policy role.
Access Control Rule Admin Portal Access
Configure Access Control Group
Extreme Campus Controller Deployment Guide for version 5.46.03 113