
Deployment Guide

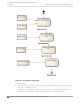


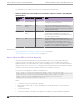

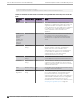
Table Of Contents
- Table of Contents
- Preface
- About Extreme Campus Controller Deployment
- Configuring DHCP, NPS, and DNS Services
- Centralized Site with a Captive Portal
- Centralized Site with AAA Network
- Deploying a Mesh Network
- Configuring an External NAC Server for MBA and AAA Authentication
- Manage RADIUS Servers for User Authentication
- External Captive Portal on a Third-Party Server
- Access Control Rule Admin Portal Access
- Deploying Centralized Web Authentication
- Deploying ExtremeCloud IQ - SE as an External Captive Portal
- Deployment Strategy
- Configuring an External Captive Portal Network
- Editing the Configuration Profile for Network and Roles
- Extreme Campus Controller Default Pass-Through Rule
- Adding Extreme Campus Controller as a Switch to ExtremeCloud IQ - Site Engine
- Editing the Unregistered Policy on ExtremeCloud IQ - Site Engine
- Editing the ExtremeCloud IQ - Site Engine Profile for Policy and Location-Based Services
- Deploying an ExtremeGuest Captive Portal
- Deploying Client Bridge
- Deploying an Availability Pair
- Deploying Universal APs
- Extreme Campus Controller Pair with ExtremeLocation and AirDefense
- ECP Local Authentication
- PHP External Captive Portal, Controller’s Firewall Friendly API
- Index

3. “Region String” is the region component of the Scope string.
4. “Service String” is the service component of the Scope string.
5. “Constant-String-To-Sign” is the string “aws4_request”.
And each of the “Create…” actions consists of generating a secure HMAC using SHA256 from the inputs.
The output secure hash is in binary format (not encoded as a hex character string). The output of each
step acts as the signing key for the subsequent step. The signing key for the first step is the shared
secret, pre-pended with the literal ‘AWS4’.
Note that for any given identity the correct signing key only needs to be computed once per day. If the
calculations are cached the cache should include an entry for the previous day to cope with the request
being sent just before midnight UTC. The previous day’s key only needs to be kept for a small
overlapping period (perhaps 10 minutes at the most).
Creating the Signature and Verifying the Request
At this point the signature for the request is computed as a secure HMAC using SHA256. The signing
key is created as described in Creating the Signing Key and the string to sign is created as described in
Building the String to Sign on page 101.
Verifying the signature in the request consists of standard string comparison between the transmitted
and computed keys. If they aren’t identical the request is invalid. The client can be sent a web page
containing a generic reject message or the request can be discarded silently.
Compose the Login or Splash Screen Page
How you create the login page depends on the programming language and toolset you use. This is
largely outside the scope of this document. You can use any programming language that can be used
for web development to create an external captive portal.
The content on the login page depends on the overall environment the ECP serves. It can contain as
little as terms and conditions and a button to indicate acceptance, or it can contain fields necessary to
submit a user ID and password.
The redirected request contains the attributes configured on the ECP configuration dialog. Attributes
can be used to decorate the login page, and other information can be input to the authentication
process. For example, a user may be considered authenticated only after logging in from one of a
specific set of APs.
Approve the Client
Typically, users submit credentials for authentication into an ECP. The credentials are submitted in an
HTTP “post”. The post invokes a script on the ECP web server passing the user’s credentials to the script
as arguments. Write the script that is adapted to your specific requirements.
The script file can have any name. For this example, the script is named “login.php”. The script can be
written in any programming language that supports web development. For this example, the script is
written in PHP.
The main job of the “login.php” script is to co-ordinate the client’s browser, the back-end authentication
server, and the appliance. The “login.php” script takes the submitted credentials, sends them to an
External Captive Portal on a Third-Party Server
Compose the Login or Splash Screen Page
Extreme Campus Controller Deployment Guide for version 5.46.03 105