
User's Guide

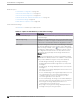
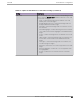

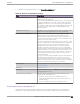
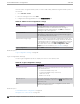


Table Of Contents
- Table of Contents
- Preface
- Welcome to Extreme Campus Controller
- Dashboard
- Monitor
- Sites List
- Device List
- Access Points List
- Smart RF Widgets
- Switches List
- Networks List
- Clients
- Policy
- Configure
- Network Configuration Steps
- Sites
- Add a Site
- Modifying Site Configuration
- Site Location
- Adding Device Groups to a Site
- Add or Edit a Configuration Profile
- Associated Profiles
- Associated Networks
- Mesh Point Profile Configuration
- Configure Client Bridge
- Understand Radio Mode
- Radio as a Sensor
- Advanced AP Radio Settings
- VLAN Profile Settings
- AirDefense Profile Settings
- ExtremeLocation Profile Settings
- IoT Profile Settings
- Positioning Profile Settings
- Analytics Profile Settings
- RTLS Settings
- Advanced Configuration Profile Settings
- Configuring RF Management
- Configuring a Floor Plan
- Advanced Tab
- Devices
- Networks
- Policy
- Automatic Adoption
- ExtremeGuest Integration
- AAA RADIUS Authentication
- Onboard
- Onboard AAA Authentication
- Manage Captive Portal
- Manage Access Control Groups
- Access Control Rules
- Tools
- Administration
- System Configuration
- Manage Administrator Accounts
- Extreme Campus Controller Applications
- Product License
- Glossary
- Index

Cloning Groups
To easily create new groups, use the cloning feature, then modify the group entries and settings as
necessary.
1. Go to Onboard > Groups.
2. Select a group from the list.
3. Select Clone.
4. Provide a name for the new group.
Extreme Campus Controller prompts you to open the new group.
5. Add, remove, or edit group entries and settings as necessary.
Related Topics
Access Control Group Settings on page 317
Working with Group Entries on page 318
Default Groups Provided with Your Installation
The following Access Control system groups are provided with the Extreme Campus Controller
installation by default.
• Blacklist. A list of MAC addresses that are prohibited from accessing the network.
• Registered Guests. A list of MAC addresses that have been granted access to the network via the
Guest captive portal.
• Registration Denied Access. A list of MAC addresses that have been denied access to the network.
• Registration Pending Access. A list of MAC addresses that are waiting permission to access to the
network.
• Web Authenticated Users. A list of MAC addresses that have been granted access to the network via
the Authenticated captive portal.
• DFNDR_PolicyGeneration. Default Group created for Extreme Defender Application. Allows
Defender Policy Generator to move clients to and from build roles.
In addition, the following Device Type groups are provided with your Extreme Campus Controller
installation:
• Windows
• Windows Mobile
• Linux
• Mac
•
iPhone
• BlackBerry
• Android
• Windows
• Mobile Game Console
• Chrome OS
You cannot delete system groups.
Onboard
Cloning Groups
Extreme Campus Controller User Guide for version 5.46.03 319