
User's Guide

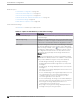
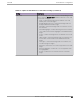

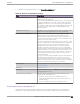
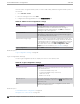


Table Of Contents
- Table of Contents
- Preface
- Welcome to Extreme Campus Controller
- Dashboard
- Monitor
- Sites List
- Device List
- Access Points List
- Smart RF Widgets
- Switches List
- Networks List
- Clients
- Policy
- Configure
- Network Configuration Steps
- Sites
- Add a Site
- Modifying Site Configuration
- Site Location
- Adding Device Groups to a Site
- Add or Edit a Configuration Profile
- Associated Profiles
- Associated Networks
- Mesh Point Profile Configuration
- Configure Client Bridge
- Understand Radio Mode
- Radio as a Sensor
- Advanced AP Radio Settings
- VLAN Profile Settings
- AirDefense Profile Settings
- ExtremeLocation Profile Settings
- IoT Profile Settings
- Positioning Profile Settings
- Analytics Profile Settings
- RTLS Settings
- Advanced Configuration Profile Settings
- Configuring RF Management
- Configuring a Floor Plan
- Advanced Tab
- Devices
- Networks
- Policy
- Automatic Adoption
- ExtremeGuest Integration
- AAA RADIUS Authentication
- Onboard
- Onboard AAA Authentication
- Manage Captive Portal
- Manage Access Control Groups
- Access Control Rules
- Tools
- Administration
- System Configuration
- Manage Administrator Accounts
- Extreme Campus Controller Applications
- Product License
- Glossary
- Index

track the status of registered end-systems, as well as add, modify, and delete registered end-systems on
the network.
1. Go to Onboard > Portal.
2. Select an existing portal or select Add.
3. Configure the following parameters on the Administration tab.
Table 83: Admin Portal Configuration Settings
Setting Description
Welcome Message Message displayed to users when they log into the
administration portal. The default welcome message is
Registration System Administration. Click Edit to modify the
message Locale or message text.
Session Timeout The length of time an administrator can be inactive on the
administration web page before being automatically logged
out. The default value is 10 minutes.
Administration Page Image Image to display on all registration administration pages. The
drop-down menu displays all the images defined in the default
portal Images window. To update this image, add the image file
to the default portal. Go to Portal Configurations and select
the Default portal. Then select Edit Configuration > Edit
Images. For more information, see Look & Feel settings.
Login Configuration Select Add to add a new configuration.
Related Topics
Login Configuration Settings on page 316
Login Configuration Settings
Set up a login configuration profile to simplify user access to the captive portal.
Table 84: Login Configuration Settings
Field Description
Authentication Type Indicates the method of authentication for the captive portal
login. Valid values are:
• Local Password Repository User
• Local Password Repository User Group
• LDAP User Group
• RADIUS User Group
Repository User Users that have been created under Local Password Repository.
Valid values are Admin or Sponsor. Click to add a new Local
Repository User.
Role Indicates the policy role for this configuration profile. Valid
values are: Admin and User.
Related Topics
Portal Administration Configuration on page 315
Manage Access Control Groups on page 317
Portal Administration
Configuration Onboard
316 Extreme Campus Controller User Guide for version 5.46.03