
User's Guide
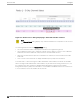
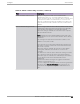
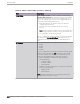
Table Of Contents
- Table of Contents
- Preface
- Welcome to Extreme Campus Controller
- Dashboard
- Monitor
- Sites List
- Device List
- Access Points List
- Smart RF Widgets
- Switches List
- Networks List
- Clients
- Policy
- Configure
- Network Configuration Steps
- Sites
- Add a Site
- Modifying Site Configuration
- Site Location
- Adding Device Groups to a Site
- Add or Edit a Configuration Profile
- Associated Profiles
- Associated Networks
- Mesh Point Profile Configuration
- Configure Client Bridge
- Understand Radio Mode
- Radio as a Sensor
- Advanced AP Radio Settings
- VLAN Profile Settings
- AirDefense Profile Settings
- ExtremeLocation Profile Settings
- IoT Profile Settings
- Positioning Profile Settings
- Analytics Profile Settings
- RTLS Settings
- Advanced Configuration Profile Settings
- Configuring RF Management
- Configuring a Floor Plan
- Advanced Tab
- Devices
- Networks
- Policy
- Automatic Adoption
- ExtremeGuest Integration
- AAA RADIUS Authentication
- Onboard
- Onboard AAA Authentication
- Manage Captive Portal
- Manage Access Control Groups
- Access Control Rules
- Tools
- Administration
- System Configuration
- Manage Administrator Accounts
- Extreme Campus Controller Applications
- Product License
- Glossary
- Index

Figure 51: Channel Select dialog displaying 5 GHz band available channels
Note
The Channel Select dialog displays only channels that match the compliance for the selected
AP.
The following details describe the Channel Select dialog:
• The selected channel number is displayed in a bold font with a lighter background.
• Select a dierent channel cell to change the channel selection. When you select a cell in a dierent
radio band, the channel width will correspond to the new radio band selection.
• When the selected channels represent a combination of channels, the selected channels include a
red border.
• Hover over the selected channels to display detailed frequency and power information.
For 6 GHz radios — When selecting the 20MHz and 40MHz channel widths, all channels are available.
When selecting 80 MHz and 160 MHz channel widths, only the Preferred Scanning Channels (PSC) can
be configured. The other channels are disabled and are displayed in a gray font with a lighter
background. Frequency and power information is not available for disabled channels. PSC channels are:
5, 21, 37, 53, 69, 85, 101, 117, 133, 149, 165, 181, 197, 213, 229.
Access Points
Configure
194 Extreme Campus Controller User Guide for version 5.46.03