
User's Guide
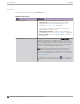
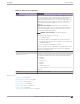
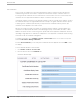
Table Of Contents
- Table of Contents
- Preface
- Welcome to Extreme Campus Controller
- Dashboard
- Monitor
- Sites List
- Device List
- Access Points List
- Smart RF Widgets
- Switches List
- Networks List
- Clients
- Policy
- Configure
- Network Configuration Steps
- Sites
- Add a Site
- Modifying Site Configuration
- Site Location
- Adding Device Groups to a Site
- Add or Edit a Configuration Profile
- Associated Profiles
- Associated Networks
- Mesh Point Profile Configuration
- Configure Client Bridge
- Understand Radio Mode
- Radio as a Sensor
- Advanced AP Radio Settings
- VLAN Profile Settings
- AirDefense Profile Settings
- ExtremeLocation Profile Settings
- IoT Profile Settings
- Positioning Profile Settings
- Analytics Profile Settings
- RTLS Settings
- Advanced Configuration Profile Settings
- Configuring RF Management
- Configuring a Floor Plan
- Advanced Tab
- Devices
- Networks
- Policy
- Automatic Adoption
- ExtremeGuest Integration
- AAA RADIUS Authentication
- Onboard
- Onboard AAA Authentication
- Manage Captive Portal
- Manage Access Control Groups
- Access Control Rules
- Tools
- Administration
- System Configuration
- Manage Administrator Accounts
- Extreme Campus Controller Applications
- Product License
- Glossary
- Index

To apply a Signed Certificate:
1. (.PFX Only) Provide the password that was used when exporting a .pfx signed certificate from the
certificate authority.
2. From the Upload Signed Certificate field, drop the certificate file. Or, select the field to navigate to
the certificate file. Valid file types are:
• .pfx
• .cer (DER Format)
• .zip
Note
Uploading a single zipped certificate to multiple APs is not supported.
Related Topics
Generate CSR on page 189
AP Certificates on page 188
AP Actions on page 186
Access Points List on page 61
Add APs
Access points and switches are automatically added to Extreme Campus Controller via the cloud-
connector when the DHCP and DNS prerequisites have been met. For full instructions on configuring
DHCP, NPS, and DNS services, refer to the Extreme Campus Controller Deployment Guide. You can use
the Add functionality to pre-provision any AP or switch before they connect.
Using the Add functionality, you can clone an existing AP or add a unique AP configuration.
If you create device groups first, then add APs, a list of discovered APs that match the site and device
group configuration settings will display on the Edit Device Group page. You can then select each AP
from the Edit Device Group page to add it to the device group.
Tip
If your APs are not displaying within the Edit Device Group page, verify the following:
• AP licensing domain matches the site Country value.
• AP model number matches the site Type and the device group Profile configuration.
Note
You can add several APs and then register them at one time. An AP that is discovered by
Extreme Campus Controller, but is not yet a member of a device group, has a status of In-
Service Trouble.
1. Go to Configure > Devices > Access Points.
2. To add a new AP, select Add.
3. To add a clone, select the check box next to an AP in the list and select Clone.
4. Configure the following parameters:
Serial Number
Access Points
Configure
190 Extreme Campus Controller User Guide for version 5.46.03