
User's Guide
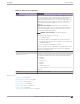
Table Of Contents
- Table of Contents
- Preface
- Welcome to Extreme Campus Controller
- Dashboard
- Monitor
- Sites List
- Device List
- Access Points List
- Smart RF Widgets
- Switches List
- Networks List
- Clients
- Policy
- Configure
- Network Configuration Steps
- Sites
- Add a Site
- Modifying Site Configuration
- Site Location
- Adding Device Groups to a Site
- Add or Edit a Configuration Profile
- Associated Profiles
- Associated Networks
- Mesh Point Profile Configuration
- Configure Client Bridge
- Understand Radio Mode
- Radio as a Sensor
- Advanced AP Radio Settings
- VLAN Profile Settings
- AirDefense Profile Settings
- ExtremeLocation Profile Settings
- IoT Profile Settings
- Positioning Profile Settings
- Analytics Profile Settings
- RTLS Settings
- Advanced Configuration Profile Settings
- Configuring RF Management
- Configuring a Floor Plan
- Advanced Tab
- Devices
- Networks
- Policy
- Automatic Adoption
- ExtremeGuest Integration
- AAA RADIUS Authentication
- Onboard
- Onboard AAA Authentication
- Manage Captive Portal
- Manage Access Control Groups
- Access Control Rules
- Tools
- Administration
- System Configuration
- Manage Administrator Accounts
- Extreme Campus Controller Applications
- Product License
- Glossary
- Index

AP Actions
Take the following actions from the AP Actions button.
Table 50: AP Actions
Field Description
Manage Certificates Manage certificates for selected APs. Possible values are:
• Generate CSR — Enter the attributes for a Certificate
Signing Request that is downloaded after the form is
complete. See Generate CSR on page 189.
Then, send the .csr file to the certificate authority to be
signed and returned as a .cer file.
• Apply Signed Certificate — Apply a signed certificate to
the selected APs. See Apply Signed Certificate on page 189.
• Reset to Default — Remove applied certificates from the
selected APs.
Assign to Site Assign selected APs to a specific site. The Assign to Site dialog
displays with available sites and device groups. Select a site
and device group; then select Ok. Selected APs must share the
same model type. Based on the AP model type, device groups
and sites are displayed in the "assign to" lists. Use this feature
to easily move APs to dierent supported sites.
Note: When working with 802.11ax access points that oer
dual-mode support, make sure that the correct discovery
options are configured for device adoption into the destination
site. For more information, see the Extreme Campus Controller
Deployment Guide.
To add a new site or device group, select and configure the
parameters. For more information, see Assign to Site on page
219.
Access Points Configure
186 Extreme Campus Controller User Guide for version 5.46.03