
User's Guide

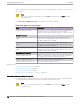
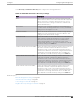
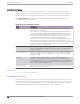
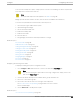

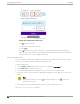
Table Of Contents
- Table of Contents
- Preface
- Welcome to Extreme Campus Controller
- Dashboard
- Monitor
- Sites List
- Device List
- Access Points List
- Smart RF Widgets
- Switches List
- Networks List
- Clients
- Policy
- Configure
- Network Configuration Steps
- Sites
- Add a Site
- Modifying Site Configuration
- Site Location
- Adding Device Groups to a Site
- Add or Edit a Configuration Profile
- Associated Profiles
- Associated Networks
- Mesh Point Profile Configuration
- Configure Client Bridge
- Understand Radio Mode
- Radio as a Sensor
- Advanced AP Radio Settings
- VLAN Profile Settings
- AirDefense Profile Settings
- ExtremeLocation Profile Settings
- IoT Profile Settings
- Positioning Profile Settings
- Analytics Profile Settings
- RTLS Settings
- Advanced Configuration Profile Settings
- Configuring RF Management
- Configuring a Floor Plan
- Advanced Tab
- Devices
- Networks
- Policy
- Automatic Adoption
- ExtremeGuest Integration
- AAA RADIUS Authentication
- Onboard
- Onboard AAA Authentication
- Manage Captive Portal
- Manage Access Control Groups
- Access Control Rules
- Tools
- Administration
- System Configuration
- Manage Administrator Accounts
- Extreme Campus Controller Applications
- Product License
- Glossary
- Index

4. Navigate to the background image file.
Extreme Campus Controller supports the following:
• File formats: .jpg, .png. svg.
Note
.svg is not supported with Internet Explorer version 11.
• Image resolution up to 2592x1456 pixels.
5. Click Open.
The background image is displayed.
6. Click Save to save the floor plan.
To remove the image: display the image on the map and click the Floor Image delete icon
. Then,
click OK.
Next, go to Setting Floor Plan Scale on page 179
Setting Floor Plan Scale
Scale the floor plan based on actual floor plan measurements. You can scale a floor plan using a
doorway measurement, or by representing any known distance in the room.
Note
The following procedure corresponds to the callout numbers in Figure 50 on page 180
To scale a floor plan:
1. Display the floor plan.
Go to Configure > Sites. Add a new site or select a site and select Floor Plans tab.
2. Select a floor plan to edit from the drop-down list.
3. Under Scale / Measures:
• Click to enter a known length in the Length field that displays.
a. Draw the physical line on the map.
b. In the field, enter a numeric value that represents the physical distance and that corresponds
to the line drawing. The pixel value for the line drawing displays.
c. Select the units of measure and click Apply.
In the following figure, the floor plan scale is set (65px = 20 Meters).
Configure
Configuring a Floor Plan
Extreme Campus Controller User Guide for version 5.46.03 179