
User's Guide
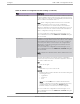
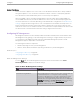
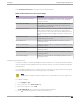

Table Of Contents
- Table of Contents
- Preface
- Welcome to Extreme Campus Controller
- Dashboard
- Monitor
- Sites List
- Device List
- Access Points List
- Smart RF Widgets
- Switches List
- Networks List
- Clients
- Policy
- Configure
- Network Configuration Steps
- Sites
- Add a Site
- Modifying Site Configuration
- Site Location
- Adding Device Groups to a Site
- Add or Edit a Configuration Profile
- Associated Profiles
- Associated Networks
- Mesh Point Profile Configuration
- Configure Client Bridge
- Understand Radio Mode
- Radio as a Sensor
- Advanced AP Radio Settings
- VLAN Profile Settings
- AirDefense Profile Settings
- ExtremeLocation Profile Settings
- IoT Profile Settings
- Positioning Profile Settings
- Analytics Profile Settings
- RTLS Settings
- Advanced Configuration Profile Settings
- Configuring RF Management
- Configuring a Floor Plan
- Advanced Tab
- Devices
- Networks
- Policy
- Automatic Adoption
- ExtremeGuest Integration
- AAA RADIUS Authentication
- Onboard
- Onboard AAA Authentication
- Manage Captive Portal
- Manage Access Control Groups
- Access Control Rules
- Tools
- Administration
- System Configuration
- Manage Administrator Accounts
- Extreme Campus Controller Applications
- Product License
- Glossary
- Index

Extreme Campus Controller is installed with a default Smart RF policy. You can modify the default
policy or create a new policy, but you cannot delete a Smart RF policy.
Note
After modifying the default RF policy settings, if you need to return to the Extreme Campus
Controller initial settings, create a new Smart RF policy. New policies are comprised of the
Smart RF settings that are delivered with the initial Extreme Campus Controller installation.
Select to create a new policy.
Related Topics
Basic RF Management Settings on page 163
Channel and Power Settings on page 165
Scan Settings for Smart RF on page 170
Neighbor Recovery Settings for Smart RF on page 171
Interference Recovery Settings for Smart RF on page 172
Scan Settings for Smart RF
A Smart RF policy can reduce deployment costs by scanning the RF environment to determine the best
channel and transmit power configuration for each radio. Scan settings define the quality and duration
of the RF scan. Scanning and recovery parameters have a defined sensitivity: Low, Medium, or High. AP
models AP4xx and AP5xx support custom sensitivity settings.
To set custom sensitivity:
1. Go to Basic Settings > Sensitivity and select Custom.
2. From the Scanning tab configure the following parameters:
Table 45: AP Scan Settings
Field Description
OCS Monitoring Awareness Override Overrides OCS scanning. Smart RF relies on O-Channel
Scanning (OCS) to monitor the RF environment in real-time,
allowing managed radios to adapt to changes in the RF
environment. OCS can negatively impact some devices. When
enabled, OCS checks for sensitive clients (for example, Voice
and Power Save clients). If sensitive clients are found, OCS is
skipped, and the Number of Threshold Awareness Hits
counter is incremented.
Number of Threshold Awareness Hits Enabled after you enable OCS Monitoring Awareness
Override.
When OCS is skipped, the OCS Awareness Hits counter is
incremented. When it reaches the Number of Threshold
Awareness Hits, OCS starts, even if sensitive clients may be
negatively aected. This is because information about other
channels is vital.
This setting indicates when channel jumping for OCS will begin
regardless of the OCS Monitoring Awareness Override setting.
If you increase this value, channel jumping will wait, resulting in
better service to sensitive clients but presenting limited
information about other channels. The default value is 10.
Configuring RF Management Configure
170 Extreme Campus Controller User Guide for version 5.46.03