
User's Guide
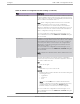
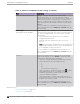
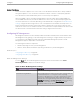
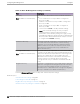
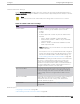
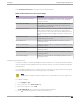

Table Of Contents
- Table of Contents
- Preface
- Welcome to Extreme Campus Controller
- Dashboard
- Monitor
- Sites List
- Device List
- Access Points List
- Smart RF Widgets
- Switches List
- Networks List
- Clients
- Policy
- Configure
- Network Configuration Steps
- Sites
- Add a Site
- Modifying Site Configuration
- Site Location
- Adding Device Groups to a Site
- Add or Edit a Configuration Profile
- Associated Profiles
- Associated Networks
- Mesh Point Profile Configuration
- Configure Client Bridge
- Understand Radio Mode
- Radio as a Sensor
- Advanced AP Radio Settings
- VLAN Profile Settings
- AirDefense Profile Settings
- ExtremeLocation Profile Settings
- IoT Profile Settings
- Positioning Profile Settings
- Analytics Profile Settings
- RTLS Settings
- Advanced Configuration Profile Settings
- Configuring RF Management
- Configuring a Floor Plan
- Advanced Tab
- Devices
- Networks
- Policy
- Automatic Adoption
- ExtremeGuest Integration
- AAA RADIUS Authentication
- Onboard
- Onboard AAA Authentication
- Manage Captive Portal
- Manage Access Control Groups
- Access Control Rules
- Tools
- Administration
- System Configuration
- Manage Administrator Accounts
- Extreme Campus Controller Applications
- Product License
- Glossary
- Index

Session Persistence
Session Persistence applies to the session state on the AP. RADIUS authentication is always handled
through the appliance — this can be the local Extreme Campus Controller or a third-party appliance.
Associated clients remain unaected by a lack of connectivity to the appliance.
When using MBA or 802.1x, the authenticating appliance must be visible. When enabling MBA, the
selected ‘MBA Timeout Role’ provides the default role to which users are automatically assigned. The
role can be permissive or restricted, depending on the administrative configuration. See WLAN Service
Settings on page 221. When using 802.1x, if none of the appliances are available, then likely there is no
path-to-authentication and new clients will be unable to authenticate on the wireless network. If the
network association is set to OPEN or PSK SSIDs, no authentication is required and the AP will associate
the device based on the ‘Default Non-Auth’ Role setting configured for the network.
Configuring RF Management
RF Management profiles are AP model dependent and reusable. Default profiles are intended to make
RF Management easy, getting you up and running without having to configure an RF policy. However,
you can always create additional profiles based o of default RF Management profiles. The RF
Management support is dependent on the AP model.
The following AP models are supported:
• AP39xx supporting ACS Policy for RF Management
• AP4000, AP3xx, AP4xx, and AP5xx supporting Smart RF Policy for RF Management
Related Topics
Configuring ACS RF Policy on page 168
Configuring Smart RF Policy on page 169
Basic RF Management Settings
From the Basic tab, set the RF Management policy for both ACS and Smart RF. Select Smart
Monitoring Enabled to display the Smart RF settings.
Table 42: Basic RF Management Settings
Field Description
Name Name of the RF Management policy.
Smart Monitoring Enabled When enabled, detector radios monitor their coverage areas for
potential failed peers or coverage area holes requiring
transmission adjustments for coverage compensation. Smart
Monitoring is enabled by default. When Smart Monitoring is
disabled, the following RF Management tabs are not displayed:
Scanning, Recovery, and Select Shutdown. And the following
settings are not displayed on the Basic Settings page:
Sensitivity and Recovery options.
Configure Configuring RF Management
Extreme Campus Controller User Guide for version 5.46.03 163