
User's Guide
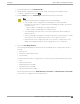
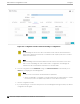


Table Of Contents
- Table of Contents
- Preface
- Welcome to Extreme Campus Controller
- Dashboard
- Monitor
- Sites List
- Device List
- Access Points List
- Smart RF Widgets
- Switches List
- Networks List
- Clients
- Policy
- Configure
- Network Configuration Steps
- Sites
- Add a Site
- Modifying Site Configuration
- Site Location
- Adding Device Groups to a Site
- Add or Edit a Configuration Profile
- Associated Profiles
- Associated Networks
- Mesh Point Profile Configuration
- Configure Client Bridge
- Understand Radio Mode
- Radio as a Sensor
- Advanced AP Radio Settings
- VLAN Profile Settings
- AirDefense Profile Settings
- ExtremeLocation Profile Settings
- IoT Profile Settings
- Positioning Profile Settings
- Analytics Profile Settings
- RTLS Settings
- Advanced Configuration Profile Settings
- Configuring RF Management
- Configuring a Floor Plan
- Advanced Tab
- Devices
- Networks
- Policy
- Automatic Adoption
- ExtremeGuest Integration
- AAA RADIUS Authentication
- Onboard
- Onboard AAA Authentication
- Manage Captive Portal
- Manage Access Control Groups
- Access Control Rules
- Tools
- Administration
- System Configuration
- Manage Administrator Accounts
- Extreme Campus Controller Applications
- Product License
- Glossary
- Index

2. For RF Management, select Default Smart RF.
3. Edit the default configuration Profile for the AP model, specifying the client bridge settings.
To edit the configuration Profile, select .
4. From the Radios tab, select Client Bridge as the Radio Mode value for either radio.
Note
Consider the following when configuring a radio as a Client Bridge:
• Only one radio can be configured as a Client Bridge. This can be either radio.
Regardless of which radio is configured as the Client Bridge, both radios will continue
to provide service.
◦ Radio 1 enables Client Bridge on the 2.4GHz band only.
◦ Radio 2 enables Client Bridge on the 5GHz band only.
• The Client Bridge radio will connect on the radio channel that is determined by the
infrastructure AP.
• When Client Bridge is configured on a single interface AP, the single interface is used as
the client port, not as an uplink, and you will not see the GE2 Port Function.
• Eight networks can be configured per radio. If one network is configured as a Client
Bridge, seven additional networks can be configured for service on that radio.
5. Select the Client Bridge Network.
The following WLAN parameters are passed to the Client Bridge AP to configure station mode on
the radio:
• Network SSID
• Encryption or Authentication type
• Pre-shared key
The selected network must be configured with one of the following supported authentication types:
• Open
• WPA2-Personal (PSK)
• WPA2-Enterprise 802.1x/EAP
• WPA3-Enterprise 802.1x/EAP
• MAC-base Authentication (MBA)
When using authentication types WPA2-Enterprise 802.1x/EAP and WPA3-Enterprise 802.1x/EAP,
select the icon to configure the user ID and password.
Configure
Add or Edit a Configuration Profile
Extreme Campus Controller User Guide for version 5.46.03 131