
Specifications

- 37 -
Tearing off a floating preview
To tear off a floating preview:
1. Choose one or more fonts in the Fonts pane.
2. For each font preview that you want to create a floating preview, click and drag the Floating Preview
button off of the Suitcase Fusion window. As you change preview type, text and size, the floating preview
updates to reflect your changes.
Activating and deactivating
Just like all other font previews, you can activate or deactivate a font directly from the floating preview.
To activate or deactivate the font, click the activation status icon in the floating preview.
Closing multiple floating previews
If you have multiple floating preview windows on your desktop, it can be tedious to click the close icon on all of the
previews. To make it faster to close multiple floating preview windows, they can be merged down into a single
preview and then closed.
To close multiple floating previews:
1. Choose Tools > Floating Previews > Merge or press Ctrl+Shift+M
2. Click the close icon on the floating preview.
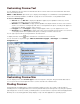
Font Snapshot
You can "tear off" a preview and save it as a picture file, for use as a reference, for customer approval, or for use in a
graphics application.
Previews are saved as 72ppi Portable Network Graphic (PNG) files with a transparent background.
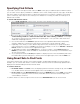
To save a preview as a graphic:
1. Choose any type of preview except Web Preview.
2. Enter the text you want to use for the preview.
3. Select the font to preview.
4. Set the desired font size.
5. Drag the icon in the preview's title bar to the desktop or a folder.
The resulting file will be named for the font you are previewing.
NOTE: Font Snapshot is only available for locally-installed fonts, not for WebINK fonts.
Printing Preview Pages
Even in our digital world, you sometimes just need to see something on paper for it to make sense. For this reason,
Suitcase Fusion includes the ability to print sample pages of fonts in the preview window.
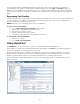
To print sample pages:
1. In the Fonts pane, select the fonts that you want to include in a printed sample page. To select multiple
items, Ctrl-click each item.To select a range of continuous items, Shift-click the first and last item.
2. Customize the preview type, text and size. The sample pages include text across the width of a printed page
using your text and size settings.
3. Choose File > Print Preview Pane.
NOTE: If you have a large number of fonts in the preview pane, or a very large point size selected, it may take a long
time and many pages to print.