
User`s guide


13
OneBridge Sync Server Installation
Upgrading to OneBridge Sync Server 4.1
Preparation
• The OneBridge Service must be shutdown during the upgrade procedure.
• While upgrading users will not be able to access the server, therefore, plan your upgrade during a period of low activity.
• You can use your existing configuration file after the upgrade, however, if you would like to activate the Live Connect
functionality, you will need to run the Live Connect Wizard after the installation has completed.
• The server's public and private keys are not modified during an upgrade.
• If you are using an Install action, you will need to update the files contained in the Installation folder with the new
OneBridge Clients.
To upgrade to OneBridge Sync Server 4.1
1. Run the setup.exe program.
2. Select Sync Server and click install now.
3. If you are prompted to stop the service before making changes to the installation, click Yes.
4. The installer will now upgrade the existing software on the server.
5. If you have an Exchange Adapter installed, the Exchange Settings program is displayed. Click Next while you review the
existing configuration.
6. If you have a Notes Adapter installed, the Notes Settings program is displayed. Click Next while you review the existing
configuration.
7. The OneBridge Service program is displayed. Click Next while you review the existing configuration.
8. The Site Wizard prompts if you would like to create a new configuration. Typically, you would select No and use the existing
configuration. If you do decide to create a new configuration, be aware that creating new Groupware Sync actions or
Database Sync actions will cause an initial sync on clients that have previously been using other sync actions.
9. Click Yes to start the OneBridge Service. Upgrade is complete.
10. If you are using an Install action to install the OneBridge Client software, remember to update the installation folder with the
new clients. The clients are available in the Clients folder of the installation package. They are also installed with the
OneBridge Sync Server in the Bin directory.
11. If you are using an existing configuration and would like to activate the Live Connect functionality for your users, you will
need to run the Live Connect wizard in Admin against your existing configuration.
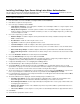
Installing OneBridge Sync Server Using Windows NT Authentication
This procedure performs a basic install of the OneBridge Sync Server. Review the Before You Install information to determine
whether additional components should be installed at this time.
Important If you are installing OneBridge Sync Server and the OneBridge Adapters on separate computers, it is recommended
that the adapter be installed first.
1. From the Installer screen of the CD-ROM, select Sync Server and click install now.
2. Click Yes to accept the License Agreement.
3. Choose the type of installation and click Next.
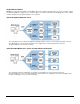
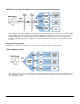
• Single Node Configuration – Select this option to install the server and adapter software on a single computer. Select
which adapters you would like to install.