
User Manual


18 SL355-EU-EN-V1.4
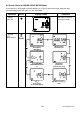
10. Meter setup using supplied software (Preferred Method)
To configure the meter using the supplied software:
1. Install the supplied software onto a PC.
2. Connect the meter to the PC using the supplied USB cable.
3. Run the software program.
4. Refer to the Software User Guide provided on the supplied CD-ROM for detailed instructions on
the use of the software program.
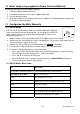
11. Configuring the Meter Manually
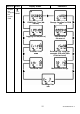
11.1 SETUP MODE
In SETUP mode, the parameters listed in the SETUP Mode Menu table and
screen shot section below can be configured. The first display in the SETUP
mode is always the currently selected setup configuration as shown in the
accompanying diagram.
1. Switch the meter ON using the power button at the upper left side of the keypad.
2. Note that the four arrow buttons are ‘smart’ navigation keys. For any given meter mode only the
active arrow buttons appear on the LCD.
3. Switch to the Set Up mode using the MENU button until SET UP is displayed.
4. Press ◄ or ► to step through the parameters shown in the menu table below.
5. To change a setting of a parameter in the menu below:
Press and Hold the RUN/PAUSE button when the desired parameter is shown (the setting
value will begin flashing indicating that it is ready to be edited).
Press ▲ or ▼ to select the desired value.
When the desired value is selected, momentarily press the RUN/PAUSE button again to
save the setting (the value will stop flashing):
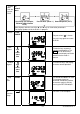
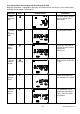
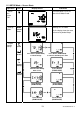
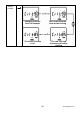
11.2 SETUP Mode - Menu Table
Icon Description
Use ◄ or ► to scroll items below. Press and hold the RUN/PAUSE to edit a parameter.
60 to 130db or 70 to 140db Measurement Ranges
F or S Fast or Slow Response Time
Er Exchange rate (3, 4, 5, or 6 db) also known as ‘Q’
A or C Frequency weighting
PK-C or PK-Z Peak SPL for C-weighting or Z-weighting (linear)
tHr Threshold level in db (70 to 90dB in 1 dB steps)
CrIt Criterion level in db (80, 84, 85 or 90dB)