User's Guide 99 Washington Street Melrose, MA 02176 Phone 781-665-1400 Toll Free 1-800-517-8431 Visit us at www.TestEquipmentDepot.
Introduction Congratulations on your purchase of the Extech SDL800 Pressure Meter. This meter displays and stores vibration readings of Acceleration, Velocity and Displacement. Supported measurement units 2 2 are meters/s , ft/s , g, mm/s, cm/s, in/s, mm and inch. Logged data readings are stored on an SD card for transfer to a PC. This meter is shipped fully tested and calibrated and, with proper use, will provide years of reliable service.
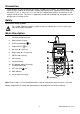
Getting Started Power ON-OFF • Power the meter by pressing and holding the power button • • Press and hold the power button for at least 1.5 seconds to power OFF the meter. This meter is powered by six (6) 1.5VDC ‘AA’ batteries or by optional AC adaptor. If the meter will not switch ON please check that fresh batteries are installed in the rear battery compartment or, in the case of the AC adaptor, check that the adaptor is connected correctly to the meter and to an AC source. for at least 1.5 seconds.
Function Selection The currently selected function is shown on the meter’s LCD. To change the function, press and hold the FUNCTION button until the desired function appears, then release the FUNCTION button. The available functions are: RMS: typical selection for Acceleration and Velocity PEAK: displays the peak value of the vibration MAX HOLD: displays and holds the max value measured MAX HOLD Reset Press and hold the ▲ and ▼ buttons for 1.5 seconds to clear the max Hold reading.
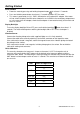
Setup Mode Basic settings at a glance To view the current configuration of the meter with regard to time, date, and datalogging sampling rate press the SET button momentarily. The meter will now display the configuration in quick succession. If the information is missed on the first try, simply press the SET button again until all of the information is noted. Accessing the Setup mode 1. Press and hold the SET button for at least 1.5 seconds to access the Setup menu. 2.
Enabling/Disabling the Auto Power OFF Feature 1. 2. 3. 4. Access the PoFF parameter. Use the arrow buttons to select ON or OFF. With the Auto Power OFF feature enabled, the meter will automatically switch OFF after 10 minutes of inactivity. Press ENTER to confirm setting. Press and hold the SET button for at least 1.5 seconds to exit to the normal operation mode (or simply wait 7 seconds for the meter to automatically switch to the normal operating mode). Set the Beeper Sound ON or OFF 1. 2. 3. 4.
Datalogging Types of Data Recording • • Manual Datalogging: Manually log up to 99 readings onto an SD card via push-button press. Automatic Datalogging: Automatically log data onto an SD memory card where the number of data points is virtually limited only by the card size. Readings are logged at a rate specified by the user. SD Card Information • • • Insert an SD card (from 1G size up to 16G) into the SD card slot at the bottom of the meter.
Automatic Datalogging In automatic datalogging mode the meter takes and stores a reading at a user-specified sampling rate onto an SD memory card. The meter defaults to a sampling rate of two seconds. To change the sampling rate, refer to the Setup Mode section (the sampling rate cannot be ‘0’ for automatic datalogging): 1. Select the sampling rate in the Setup Mode to a value other than zero. 2. Press and hold the LOG button for at least 1.5 seconds.
Spreadsheet data example RS-232/USB PC Interface The optional 407001A software kit (software and cable) allows streaming of data to a PC via the RS232 Output jack. AC Power Adaptor This meter is normally powered by six (6) 1.5V ‘AA’ batteries. An optional 9V power adaptor is available. When the adaptor is used, the meter is permanently powered and the power button will be disabled. Battery Replacement and Disposal When the low battery icon appears on the LCD, the batteries must be replaced.
Specifications Display Status indicators Frequency Range Datalogger Sampling Rate Backlit LCD; LCD size: 52 x 38mm (2 x 1.5”) Over-range audible beep and low battery display icon 10Hz to 1kHz AUTO LOGGING: From 1 to 3600 seconds. MANUAL LOGGING: Set the sampling rate to ‘0’ seconds SD memory card; 1G to 16GB size Freeze the displayed reading Record and Recall the Maximum and Minimum readings Approx. 1 second RS-232 / USB PC computer interface 0 to 50°C (32 to 122°F) 85% R.H. max.