User Manual Heavy Duty Differential Pressure Manometer Model SDL730 Additional User Manual Translations available at www.extech.
Introduction Congratulations on your purchase of the Extech SDL730 Pressure Manometer. This device measures gauge and differential pressure in the range of ±100 psi. Supported measurement units are mbar, psi, Kg/cm2, mm Hg, inch Hg, meters of H2O, inches of H2O, atmosphere, hPA, and kPA. Logged data readings are stored on an SD card for transfer to a PC. This meter is shipped fully tested and calibrated and, with proper use, will provide years of reliable service. Please visit our website (www.extech.
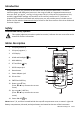
Getting Started Power ON‐OFF Power the meter by pressing and holding the power button Press and hold the power button for at least 1.5 seconds to power OFF the meter. This meter is powered by six (6) 1.5VDC ‘AA’ batteries or by optional AC adaptor. If the meter will not switch ON please check that fresh batteries are installed in the rear battery compartment or, in the case of the AC adaptor, check that the adaptor is connected correctly to the meter and to an AC source. for at least 1.5 seconds.
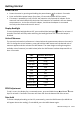
Setup Mode Basic settings at a glance To view the current configuration of the meter with regard to time, date, and datalogging sampling rate press the SET button momentarily. The meter will now display the configuration in quick succession. If the information is missed on the first try, simply press the SET button again until all of the information is noted. Accessing the Setup mode 1. 2. 3. 4. 5. Press and hold the SET button for at least 1.5 seconds to access the Setup menu.
. Press and hold the SET button for at least 1.5 seconds to exit to the normal operation mode (or simply wait 7 seconds for the meter to automatically switch to the normal operating mode). Enabling/Disabling the Auto Power OFF Feature 1. 2. 3. 4. Access the PoFF parameter. Use the arrow buttons to select ON or OFF. With the Auto Power OFF feature enabled, the meter will automatically switch OFF after 10 minutes of inactivity. Press ENTER to confirm setting. Press and hold the SET button for at least 1.
System Reset If the meter’s keys become inoperable or if the display freezes the Reset button can be used to reset the instrument. Use a paper clip or similar item to momentarily press the reset button located on the lower right side of the instrument under the snap‐off compartment cover. After pressing the Reset button, switch the instrument ON by pressing and holding the POWER key for at least 1.5 seconds. If using the power adaptor unplug the adaptor and then plug it back in again to power the meter.
European and USA numerical formats differ. The data on the SD card can be formatted for either format. The meter defaults to USA mode where a decimal point is used to separate units from tenths, i.e. 20.00. The European format uses a comma, i.e. 20,00. To change this setting, refer to the Setup Mode section. Manual Datalogging In the manual mode the user presses the LOG button to manually log a reading onto the SD card. 1. Set the sampling rate to ‘0’ seconds as described in the Setup Mode section. 2.
SD Data Card to PC Data Transfer 1. 2. 3. 4. Complete a datalogging session as detailed above in the previous sections. Hint: For the first few tests, simply record a small amount of test data. This is to ensure that the datalogging process is well understood before committing to critical, large scale datalogging. With the meter switched OFF, remove the SD Card. Plug the SD Card directly into a PC SD card reader.
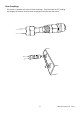
Hose Couplings This meter is supplied with a pair of hose couplings. They fit 4.0mm (0.157”) tubing. See diagram on how to connect these couplings to the hose and the meter. 9 SDL730-en-GB_V1.
Battery Replacement and Disposal When the low battery icon appears on the LCD, the batteries must be replaced. Several hours of accurate readings are still possible in this condition; however, batteries should be replaced as soon as possible: Remove the two (2) Phillips screws from the rear of the meter (directly above the top of the tilt stand). Remove and safely place the battery compartment and screws where they will not be damaged or lost. Replace the six (6) 1.
Specifications General Specifications Display Backlit LCD; LCD size: 51 x 37mm (2 x 1.5”) Status indicators Over‐range audible beep and low battery display icon Measurement Units mBar, psi, Kg/cm2, hPA, mm Hg, inch Hg, meters H2O, kPA, inches H2O, ATP Accuracy (Meter) ± (2%FS) at ambient temperature 23°C (± 5°C) Input circuit Input Ports Hose couplings Sensor Differential inputs (P1 + and P2 ‐) Two metal 5.0mm (0.197”), barbed for 4.0mm(0.
Range/Resolution Specifications Range/Units (Max.) ± 7000 mbar ± 101.5 psi ± 7.135 Kg/cm2 ± 5250 mm Hg ± 206.7 inches Hg ± 700.0 kPa ± 7000 hPA ± 2810 inches H2O ± 71.35 m H2O ± 6.905 ATP Resolution 5 0.05/0.1 0.005 5 0.1 0.5 5 2 0.05 0.005 Conversions Useful conversion Factors From To Multiplier in of H2O in of Hg 0.07355 in of H2O cm of H2O 2.54 mm of Hg in of H2O 0.53524 Copyright © 2016 FLIR Systems, Inc.