User's Guide Dissolved Oxygen (DO) Meter SD Card real-time Datalogger Model SDL150
Introduction Congratulations on your purchase of the Extech SDL150 Dissolved Oxygen Meter, an SD Logger Series meter. This meter displays and stores Dissolved Oxygen readings in the 0 to 20.0mg/L range, Oxygen in air from 0 to 100%, and Temperature from 0 to 50oC (32 to 122oF). The SDL150 uses a polarographic oxygen probe that also measures temperature. %Salt and Altitude compensation can be fine tuned by the user in the Setup mode. Logged data readings are stored on an SD card for transfer to a PC.
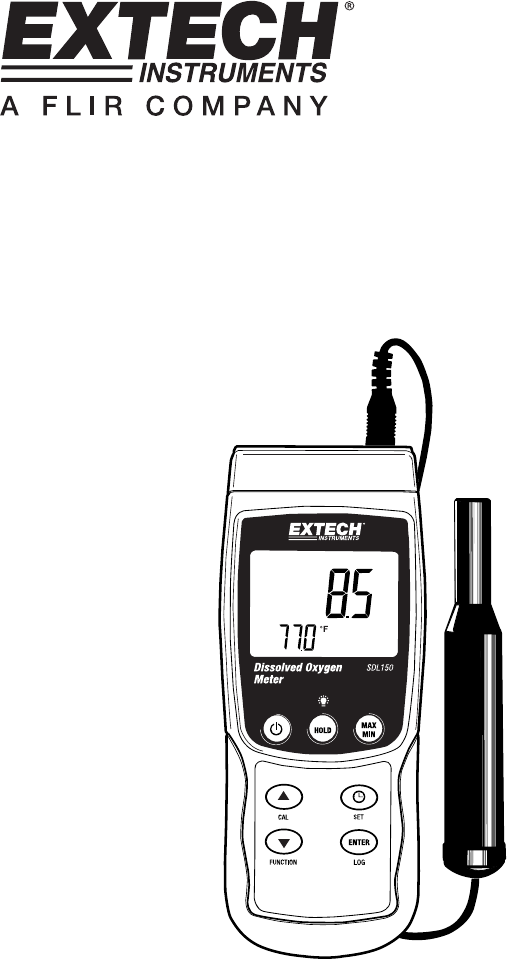
Probe Description 1. Probe to meter input plug 2. Probe body handle 3. Temperature Sensor 4. Probe head 5. Protective cap 1 2 3 4 5 Getting Started Accessories • The SDL150 includes batteries, SD card, probe (with spare probe head and diaphragm), electrolyte, and carry case.
Taking Dissolved Oxygen Measurements 1. Immerse the DO probe into the solution under test to a depth of at least 10cm. The depth specification is important since the temperature measurement of the solution and the automatic temperature compensation circuitry rely on the probe depth to operate correctly. 2. Allow the test to stabilize for several minutes to achieve thermal equilibrium between the probe and measurement sample. 3.
Calibration 20.9% Oxygen in Air Calibration 1. 2. 3. 4. 5. 6. Connect the DO probe to the input jack at the top of the meter Power the meter by pressing and holding the power button for 1.5 seconds Press and hold the FUNCTION button for 1.5 seconds to switch from mg/L mode to O2 mode Allow the probe to stabilize for at least 5 minutes in a large well ventilated environment. Press and hold the CAL button for 1.5 seconds.
Probe Maintenance First time use Before first use, ensure that the probe is filled with the supplied electrolyte solution (refer to the electrolyte filling instructions later in this guide) Subsequent uses 1. Ensure proper electrolyte level in probe 2. Calibrate the probe with the meter before each use 3.
Display Backlight To turn the display backlight ON or OFF, press and hold the backlight seconds. button for at least 1.5 Data Hold To freeze a displayed reading on the LCD, momentarily press the HOLD button (the HOLD display icon will appear). To release the held reading, press the HOLD button again. Max-Min Reading Record and Recall For a given measurement session, this meter can record the highest (MAX) and the lowest (MIN) readings for later recall. 1.
Setup Mode Basic settings at a glance To view the current configuration of the meter with regard to time, date, and datalogging sampling rate press the SET button momentarily. The meter will now display the configuration in quick succession. Repeat as necessary to observe all the information. Accessing the Setup mode 1. Press and hold the SET button for at least 1.5 seconds to access the Setup menu. 2. Press the SET button momentarily to step through the available parameters.
Enabling/Disabling the Auto Power OFF Feature 1. 2. 3. 4. Access the PoFF parameter. Use the arrow buttons to select ON (enable) or OFF (disable). With the Auto Power OFF feature enabled, the meter will automatically switch OFF after 5 minutes of inactivity. Press ENTER to confirm setting. Press and hold the SET button for at least 1.5 seconds to exit to the normal operation mode (or simply wait 7 seconds for the meter to automatically switch to the normal operating mode).
Set the Altitude Compensation (in meters) for DO measurements only 1. 2. 3. 4. Access the Height parameter. Use the arrow keys to select the altitude compensation (0 to 8900 meters in 100 meter steps) Press ENTER to confirm setting. Press and hold the SET key for at least 1.5 seconds to exit to the normal operation mode (or simply wait 7 seconds for the meter to automatically switch to the normal operating mode). Set the Altitude (F) Compensation (in feet) for DO measurements only 1. 2. 3. 4.
Manual Datalogging In the manual mode the user presses the LOG button to manually log a reading onto the SD card. 1. Set the sampling rate to ‘0’ seconds as described in the Setup Mode section. 2. Press and hold the LOG button for at least 1.5 seconds and the DATALOGGER icon will appear on the LCD; the lower portion of the display will show ”P N” (N = memory position number 1-99). 3. Momentarily press the LOG button to store a reading. The DATALOGGER icon will flash each time a data point is stored. 4.
Spreadsheet data example RS-232/USB PC Interface The optional 407001A software kit (software and cable) allows streaming of data to a PC via the RS232 Output jack. AC Power Adaptor This meter is normally powered by six (6) 1.5V ‘AA’ batteries. An optional 9V power adaptor is available. When the adaptor is used, the meter is permanently powered and the power button will be disabled. Battery Replacement and Disposal When the low battery icon appears on the LCD, the batteries must be replaced.
Specifications General Specifications Display 52 x 38mm (2 x 1.5”) Backlit LCD Status indicators Out-of-range (----) and low battery Probe type Polarographic type oxygen probe with temperature measurement Measurement Units DO (Dissolved Oxygen) in mg/L units O2 (Oxygen) in air in percent units Temperature in °C/°F units Datalogger Sampling Rate AUTO LOGGING: From 1 second to 8 hours 59 minutes and 59 seconds.