
User Manual


SD200-EU-EN-V1.2-7/10
4
Operation
Battery Low Warning, Installation and Replacement
1. When the
icon appears in the display the batteries are weak and should be
replaced. However, in-spec. measurement may still be made for several hours, after
low battery indicator appears, before the instrument become inaccurate.
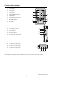
2. To replace or install batteries, remove the Philips head screw that secures the rear
battery cover and lift off the cover.
3. Replace the six AAA batteries (use alkaline heavy duty type), observing polarity
4. Replace and secure the cover.
Connecting thermocouples
1. Insert the Type K thermocouple mini-connector plug into the mini-connector socket on
the bottom of the datalogger observing polarity (wide blade/narrow blade)
2. Up to three probes may be installed.
3. The temperature for inserted probes will be displayed T1, T2, T3 from top to bottom.
4. “-------“ will be displayed for open or unused inputs.
Datalogging
1. Open the left side door and insert a formatted SD card
Note: The SD card should be at least 1GB in capacity
Note: Do not use memory cards formatted by other meters or cameras. Use the SD
card formatting procedure under the advanced features section of this manual
to correctly format the card.
Note: The internal clock must be set to the correct time See the advanced features
section of this manual to set the clock.
Note: The default data structure uses a decimal point “.” as the numeric decimal
indicator. See the advanced features section of this manual to change this to a
comma “,”.
Note: If the SD memory card is not installed, “EMPTY” will appear in the display
Note: If the temperature probe is not installed, random numbers may appear in the
data file.
Note: If the temperature probe is not installed, after data download the temperature
units symbol may not appear in the display.
Note: Displayed error messages:
The memory card is full or there is a problem with the card
The battery is low and datalogging is disabled
The SD card is not inserted
no
CArd
LobAt
CH-
CArd