User's Guide Digital Sound Level Meter Model 407732 Test Equipment Depot - 800.517.8431 - 99 Washington Street Melrose, MA 02176 FAX 781.665.0780 - TestEquipmentDepot.
(781) 890-7440 ext. 210 for authorization or visit our website www.extech.com for contact information. A Return Authorization (RA) number must be issued before any product is returned to Extech. The sender is responsible for shipping charges, freight, insurance and proper packaging to prevent damage in transit.
Specifications Display 4-digit (4000 count) backlit LCD Display update rate 0.5 seconds Microphone 0.5” Electret condensor Measurement Bandwidth 31.5Hz to 8KHz Dynamic range 65dB Measurement Range 35 to 130dB (Low: 35 to 100; High: 65 to 130dB) Frequency weighting ‘A’ and ‘C’ (selectable) Accuracy / Resolution ± 1.5dB (under reference conditions) / 0.
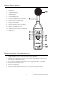
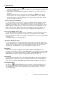
Meter Description 1. Microphone 2. 4-digit LCD Display 3. ON-OFF button 4. LCD Backlight button 5. Frequency weighting selection button 6. Response time selection button 7. Range selector button 8. Max Hold / Data Hold selector button 9. Battery compartment on rear 10. Calibration pots in battery compartment 11. Windscreen Measurement Considerations 1. Wind blowing across the microphone increases the noise measurement. Use the supplied windscreen to cover the microphone when applicable.
Operation 1. Power the meter by pressing the power button. The meter will begin displaying sound level readings. If the LCD does not switch on, check the 9V battery located in the rear battery compartment. 2. Hold the meter in hand facing the microphone toward the source of the sound to be measured. 3. View the measurement on the meter’s LCD. An indication of OVER means that the measurement is out of range. Toggle the ‘Hi’ (65 to 130dB) and ‘Lo’ (35 to 100dB) measurement ranges using the HI/LO button.
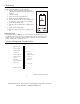
Calibration To calibrate the 407732, an external calibrator such as the Extech 407744 or the Extech 407766 is required in addition to a small screw-driver. 1. Open the battery compartment and locate the two calibration potentiometers behind the 9V battery (see diagram) 2. Turn the meter ON 3. Put the meter in the ‘A’ weighting mode 4. Put the meter in the ‘SLOW’ response mode 5. Place the 407732 microphone into the calibrator. Set the calibrator to output a 1kHz sine wave @ 94dB 6.