
User Manual


Model 407123 Version 5.1 January 2006
5
MIN and MAX Function
1. To begin capturing the Minimum (MIN) and Maximum (MAX) readings, press the
RECORD button. The ‘REC’ icon will appear on the LCD.
2. Take readings as described previously.
3. Press the RECALL button to view the Maximum reading encountered since the
RECORD button was pressed. The ‘MAX’ display icon will appear along with the
maximum reading.
4. Press RECALL again to view the minimum reading (MIN).
5. Press the RECORD button to exit this mode and return to normal operation.
Data Hold
To freeze the LCD display, press the HOLD button. The 'DH' display icon will appear on
the LCD. Press the HOLD button again to return to normal operation (the 'DH' hold icon will
switch off).
Test Equipment Depot - 800.517.8431 - 99 Washington Street Melrose, MA 02176
FAX 781.665.0780 - TestEquipmentDepot.com
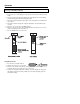
Battery Replacement
When the low battery indicator (LBT) appears on the LCD or if the LCD does not switch on
when the POWER button is pressed, replace the batteries.
1. Remove the protective rubber holster that encapsulates the meter.
2. Open the rear battery compartment by prying the compartment off with a flat-head
screwdriver or a coin.
3. Replace the six ‘AAA’ 1.5V batteries observing polarity.
4. Replace the battery compartment cover and the protective holster.
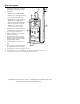
PC Interface
The meter is equipped with an RS-232 PC Interface jack at the top of the meter (next to the
sensor input jack). This port is for use with the Extech Part Number 407001 Data
Acquisition software and interface cable kit. Directions for use are supplied with the
407001 kit. The interface kit allows the user to take measurements and view/save the
readings on a PC.