
User Manual


Hi / Lo Limits Mode
The Hi / Lo limits mode compares the measured value to the stored high and low limit
values and gives an audible and visible indication if the measured value is outside the
limits. See the setting Hi/Lo limits paragraph below to store the limits in memory.
1. Press the Hi/Lo LIMITS key to enter the mode. The display will briefly show the
stored upper limit with the “ “ indicator and then the stored lower limit with the “ “
indicator before displaying the measured value.
2. The meter will sound an audible tone and blink the upper or lower limit indicator if
the measured value is outside the limits.
3. The meter will ignore an “OL” overload reading.
4. Press the Hi/Lo LIMITS key to exit the mode.
% Tolerance Mode
The % Tolerance Limits mode compares the measured value to a % high and low limit
based on a stored reference value and gives an audible and visible indication if the
measured value is outside the limits. Any % limit can be entered in the SET % Limit mode
(see paragraph below) or standard 1%, 5%, 10% and 20% symmetrical limits can be
selected directly in the % Tolerance mode.
1. Press the TOL key to enter the mode. The display will briefly show the stored
reference value in the main display and the small display will indicate the %
difference between the measured value and the reference value. See the SET %
Limit paragraph to change the reference value.
2. Press the TOL key to step through and select the 1, 5, 10 or 20% settings. The
selected % will briefly appear in the small display.
3. Previously stored user defined % limits are accessed by pressing the SET key.
4. The meter will sound an audible tone and blink the upper or lower limit indicator if
the measured value is outside the limits.
5. Press and hold the TOL key for 2 seconds to exit the mode.
Set Limits and Open/Short Calibration Selection
The SET key is used to; 1. Set Hi/Lo limits, 2. Set % limits, 3. Set Tolerance reference
value and 4. Perform the Open / Short calibration. The SET mode can only be activated if
no other function is active.
Entering the SET mode
1. Power ON and press the SET key.
2. The display will clear, “SEt“ will appear in the small display and a flashing TOL
and flashing indicators will appear in the display.
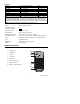
3. The 5 keys that are now active are; Power, SET, REL, Hi/Lo, and TOL
Open and Short Calibration
The Open and Short function removes stray parallel and series fixture impedances from
the measured value. This feature improves accuracy for very high or low impedances.
(Note: Remove any leads from the meter during this procedure. Leaving them connected
will add impedance to the circuit causing the calibration to fail indicated by OUT UAL
appearing on the display.)
1. Press the SET key 2 times and the display will indicate “CAL OPEn”.
2. Remove any devices or test leads and press “ENTER” (PAL SER). After several
seconds the calibration will complete and display “CAL SHrt”.
3. Short circuit the test fixture and press “ENTER” (PAL SER). After several seconds
the calibration will complete and the meter will return to normal operation.
4. Press the “SET” to bypass either the open or short calibration.
99 Washington Street
Melrose, MA 02176
Phone 781-665-1400
Toll Free 1-800-517-8431
Visit us at www.TestEquipmentDepot.com
Back to the Extech 381193 Product Page