USER MANUAL Video Particle Counter with built-in Camera Model VPC300 Additional User Manual Translations available at www.extech.
VPC300-en-GB_v1.
Introduction Thank you for selecting the Extech Instruments Model VPC300 Particle Counter with Camera. The VPC300 has a Color TFT LCD display, a 74MB internal data storage bank, a micro-SD memory card slot for capturing images and video for viewing on a PC, and a built-in 320x240 pixel camera for capturing stills/video of test locations. The VPC300 offers quick and accurate readings for particle count, air temperature, most surface temperatures, and relative humidity.
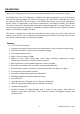
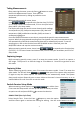
Meter Description 1. 2. 3. 4. 5. 6. 7. 8. 9. 10. Isokinetic probe Temperature and RH Sensor (note its protective cover that slides up and down) Color TFT LCD Compartment for USB interface port and AC Adaptor/Charger Function F1, F2, F3 buttons Control buttons: Page Up/Down, Enter, Run/Stop, and ESC ON/OFF button Battery and Micro-SD card compartment (SD card slot underneath battery) Tripod mount Camera lens 4 VPC300-en-GB_v1.
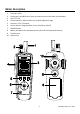
Operation Power ON-OFF Press and hold the power button to switch the instrument ON or OFF. Important Notes Note: Operating the particle counter with the isokinetic probe cap in place will damage the pump and other internal components. Note: Electrical noise, sensor leakage, or other interference may cause the VPC300 to show incorrect particle count data.
Sequence of Operation To ensure that you measure the amount of particles accurately, perform this sequence of operation. 1. Zero the particle count sensor 2. Setup your counter for proper operation. Sample time, mode, cycle, and interval. 3. Run your test cycles and evaluate the results. Basic Operation Press and hold the ON/OFF button for 3 to 5 seconds until the display illuminates to power on the meter. Press the enter button ( ) to get to setup mode. Press F3 to enter settings mode.
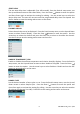
Taking Measurements After powering the meter, press the Enter ( ) button to access the Particle Measurement screen. Then open the temperature/RH sensor by sliding its protective cover downward. When measuring particle counts, these icons correspond to the function keys (F1,F2,F3). F1 is to enter Camera and video mode, F2 is to view your saved data, and F3 is for Setup mode.
sampling time/gas volume (3 to 60 seconds). Use the Esc button to save and return to the menu. 8 VPC300-en-GB_v1.
START DELAY The test start delay time is adjustable (3 to 100 seconds). From the Particle setup menu, use the Up and Down arrows to select Start Delay. Press the Enter ( ) button to enter the option and Press Enter again to activate the setting for editing. Use the arrow keys to select the desire delay time. The test will not start until the programmed delay time has elapsed. Use the Esc button to save the setting and to return to the menu. CHANNEL DISPLAY Select channels that are to be displayed.
SAMPLE MODE Select desired mode ( Cumulative, Differential, or Concentration). From the Particle setup menu, use the Up and Down arrows to select Sample Mode. Press the Enter ( ) button to enter the option. Use the arrow buttons to select desired mode and then use ESC to save and to return to the menu. Cumulative Mode – measures all particles that are greater than or equal to the particle size selected in the Sample Volume field.
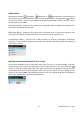
LEVEL (ALARM LIMIT) INDICATION Select the Alarm Limit (Level) of the corresponding particle size. When the selected particle size is exceeded, the instrument alerts the user. From the Particle setup menu, use the Up and Down arrows to select Level Indication. Press the Enter ( ) button to enter the option. Use the arrow buttons to select the desired alarm limit and then press ESC to save setting and return to the menu. Memory Storage Browser When the meter is switched ON, these LCD icons are visible .
System Setup Parameters When the meter is switched ON, these LCD icons are visible . Click on the F2 key and the menu will appear. Detailed explanations are provided below for each parameter. Use the Arrow keys to choose the desired parameter. DATE/TIME Set the Date and Time. Press the Enter ( ) button to open the selection for editing. Use the arrow keys to change a value, and use the Enter button to go to the next item. Press the ESC button to save the setting return to the Setup menu.
BRIGHTNESS Adjust the display to the desired brightness level. Press the Enter ( ) button to open the selection for editing. Use the arrow keys to select a level and use the ESC button to save the setting and return to the Setup menu. AUTO POWER OFF Select elapsed time value before meter switches OFF. Press the Enter ( ) button to open the selection for editing. Use the arrow keys to select the setting and use the ESC button to save the setting and return to the Setup menu.
MEMORY STATUS Display the memory and the micro-SD card status. Press the Enter ( ) button to open the selection for editing. Use the arrow keys to select ‘Device’ or ‘SD Card’ and then view the status for the selected item. Use the ESC button to return to the Setup menu. FACTORY DEFAULT Restore factory default settings. Press the Enter ( ) button to open the selection for editing. Use the arrow keys to select YES or NO and then use the ESC button to save the setting and return to the Setup menu.
Zero the Particle count Sensor Particles must be purged (removed) from the sensor before and after each use in a high sample count environment. Zero the sensor: 1. Unscrew and remove the Isokinetic probe and attach the Zero count filter. 2. Turn on the meter and in the Setup mode, a. Set the Sample mode to Cumulative. b. Set the Channel Display to ensure all channels are selected. c. Set Sample time to 60 seconds d. Set Sample Cycle to 10 3. Start the meter 4.
Particle Counter Considerations Particle pollution is a mixture of various components including smoke, dust, chemicals, mold, and gases. Particle concentrations can affect our health and comfort levels. Evaluating the quality of the air by determining the concentration and size of these particles can help to determine if a problem exists. Locating the source of these various particles can help to determine effective methods of reducing these and improving the Indoor Air Quality (IAQ).
Battery Charging and Replacement When the battery icon appears drained on the LCD or if the meter will not switch ON, the battery must be recharged using the supplied AC adaptor/charger. The charger plug connects to the jack located on the meter’s left side compartment. The battery compartment is located on the rear of the instrument. The battery is a 7.4V Lithium-ion polymer rechargeable battery. To access the meter’s battery for replacement: 1.
Specifications Particle Counter Channels Six channels: 0.3, 0.5, 1.0, 2.5, 5.0, 10μm Flow Rate 0.1ft3/min (2.83L/min) Counting Efficiency 50% at 0.3μm; 100% for particles > 0.