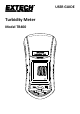
USER GUIDE Turbidity Meter Model TB400
Introduction Congratulations on your purchase of the TB400 Turbidity tester. The TB400 measures turbidity up to 1000 NTU. The advantages of the TB400 to the user include: Easy to use and maintain, high accuracy, self-calibration, and fast response. This meter is shipped fully tested and calibrated and, with proper use, will provide years of reliable service. Please visit our website (www.extech.com) to check for the latest version of this User Guide, Product Updates, and Customer Support.
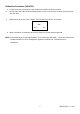
Measurement Procedure Calibration 1. Ensure that the meter has been calibrated prior to use. 2. Refer to the calibration section for this procedure. Sample Preparation 1. Place the testing liquid into the supplied sample bottle up to the 10mL line and secure the cap to the bottle. 2. Clean and dry the outside of the sample cup to ensure a clean surface. Measurement 1. The meter should be switched OFF. 2. Open the test chamber cover and Insert the testing bottle completely into the chamber. 3.
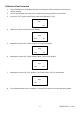
Calibration A complete calibration will require testing with both 0 NTU and 100 NTU test solutions. Notes: Before calibrating, gently shake the test solution bottle for approximately two seconds. Ensure that the sides of the bottle are clean and dry to prevent measurement errors. Calibration Procedure (0 NTU) 1. Insert the Zero NTU solution bottle into the testing chamber, line up the white marks, and close and latch the cover.
Calibration Procedure (100 NTU) 1. Lift the lid on the test chamber and remove the 0 NTU test solution bottle. 2. Gently shake the 100 NTU test solution bottle, insert it into the test chamber and close and lock the cover. 3. Momentarily Press the "CAL" button. The LCD will flash CAL for 10 seconds. CAL 100 ntu 4. When calibration is complete the LCD will return to normal operating mode. NOTE: If the following error message appears "Error cannot be calibrated...
Calibration Clear Procedure 1. The calibration clear procedure will clear all calibration values and return the meter to default settings. 2. Power ON the meter with the cover closed but no testing bottle in the chamber. 3. Press the "CAL" button continuously until the LCD displays "CAL" CAL ntu 4. Wait one second; the LCD will then display: 0.00 CAL 5. ntu Momentarily press the "HOLD" button. The LCD will display: 100 CAL 6. ntu Momentarily press the "HOLD" button again.
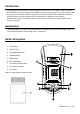
Maintenance Low Battery Indication When the batteries become weak the “ ” icon will appear in the display. Refer to the Battery Replacement section for battery replacement information. Battery Replacement 1. 2. 3. Remove the two (2) screws on the back of meter and remove the battery cover. Replace the six (6) AAA batteries observing polarity. Close the battery cover and replace the screws. Battery Safety Reminders Never dispose of batteries in a fire. Batteries may explode or leak.
Specifications Display LCD size: 41mm x 34mm (1.6 x 1.3”) Range 0.00 to 50.00 NTU (Nephelometric Turbidity Unit) 50 to 1000 NTU Resolution 0.01 NTU/1 NTU Accuracy ±5% FS or ± 0.5 NTU whichever is greater Operating Temperature 0 to 50 C (32 to 122 F) Operating Humidity Less than 85% RH Light Source LED, 850 nm Light Detector Photo Diode Response Time Less than 10 seconds Sample Volume 10mL minimum Power Six 1.5V AAA batteries Power consumption Standby Mode: approx. 3.