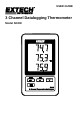
USER GUIDE 3 Channel Datalogging Thermometer Model SD200
Introduction Congratulations on your purchase of the Extech SD200 3-Channel Temperature Datalogger. This meter displays and stores temperature readings from one to three type k thermocouple temperature probes. Data is stored on a SD card for transfer to a PC. This meter is shipped fully tested and calibrated and, with proper use, will provide years of reliable service. Please visit the Extech Instruments website (www.extech.com) to check for the latest version of this User Guide.
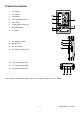
Product Description 1. T1 Display 2. T2 Display 3. T3 Display 4. LOG (ENTER) button 5. SET button 6. Temperature Units icon 7. ▲(TIME) button 8. ▼ button 9. AC adaptor socket 10. Reset button 11. RS-232 output 12. SD memory card socket 13. T1 thermocouple input 14. T2 Thermocouple input 15. T3 thermocouple input Note: Battery Compartment and Tilt Stand are located on the back of the meter. 3 SD200-EN v1.
Operation Battery Low Warning, Installation and Replacement 1. When the icon appears in the display the batteries are weak and should be replaced. However, in-spec. measurements may still be made for several hours, after low battery indicator appears, before the instrument becomes inaccurate. 2. To replace or install batteries, remove the Philips head screw that secures the rear battery cover and lift off the cover. 3. Replace the six AAA batteries (use alkaline heavy duty type), observing polarity 4.
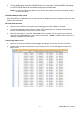
3. To stop datalogging, press the LOGGER button for >2 seconds. “DATALOGGER” will change to “DATA” and the meter will count down through the recorded data. NOTE: To avoid corrupting any data, do not remove the memory card without properly ending the record function. Time/Date/Sample Rate Check Press and Hold the TIME button for >2 seconds and the display will cycle through the date, time and sample rate information. SD Card Data Structure 1.
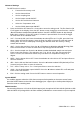
Advanced Settings The SET function is used to: Format the SD memory card Set the date and time Set the sampling time Set the beeper sound ON/OFF Set the SD card Decimal character Select the Temperature units Set the RS232 data output ON/OFF 1. Press and Hold the SET button for >2 seconds to enter the setting mode. The first function (Sd F) will appear in the display. Press the SET button to step through the seven functions. Use the ▲ and ▼ buttons to adjust the selected function.
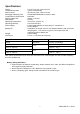
Specifications Display Temperature probes Memory Card Datalogger Sampling Time Temperature Compensation Display update rate Data Output Operating Temperature Operating Humidity Power Supply Battery life Weight Dimension 2.4 x 2.0” (60 mm x 50 mm) LCD Type K thermocouple SD memory card, 1 GB to 16 GB. 5/10/30/60/120/300/600 seconds or Auto. Automatic Approx. 1 second RS 232 32 to 122°F (0 to 50 °C) Less than 85% R.H. 6 AAA (UM4) Alkaline or heavy duty 1.5 V batteries or 9V AC adaptor.
Warranty FLIR Systems, Inc. warrants this Extech Instruments brand device to be free of defects in parts and workmanship for one year from date of shipment (a six month limited warranty applies to sensors and cables). If it should become necessary to return the instrument for service during or beyond the warranty period, contact the Customer Service Department for authorization. Visit the website www.extech.com for contact information.
Garantie FLIR Systems, Inc. garantit que cet appareil Extech Instruments est exempt de défauts matériaux et de fabrication pendant un an à partir de la date d’envoi (une garantie limitée de six mois s’applique aux capteurs et aux câbles). Si le renvoi de l’appareil pour réparation devient nécessaire durant ou après la période de garantie, contactez le service client pour autorisation. Pour obtenir les coordonnées, visitez le site Web suivant : www.extech.com.
Garantía FLIR Systems, Inc., garantiza este dispositivo marca Extech Instruments para estar libre de defectos en partes o mano de obra durante un año a partir de la fecha de embarque (se aplica una garantía limitada de seis meses para cables y sensores). Si fuera necesario regresar el instrumento para servicio durante o después del periodo de garantía, llame al Departamento de Servicio a Clientes para obtener autorización. Visite www.extech.com para Información de contacto.