USER GUIDE Humidity / Temperature Datalogger Model RHT10
Introduction Congratulations on your purchase of the Relative Humidity and Temperature Datalogger. This datalogger measures and stores up to 16,000 relative humidity and 16,000 temperature readings over 0 to 100%RH and -40 to +70°C (-40 to +158°F) measurement ranges. The user can easily configure the logging rate, high/low alarm and start-mode, and download the stored data by plugging the module into a PC's USB port and running the supplied PC software.
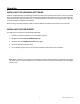
Operation INSTALLING THE GRAPHING SOFTWARE Install the supplied Windows PC Datalogger Software by placing the supplied program disk in the PC’s CD-ROM drive. If the installation program does not automatically open and provide on-screen prompts, open and browse the CD-ROM drive, then find and double-click on the SETUP.EXE file included on the program disk. Follow the on-screen prompts to complete the installation.
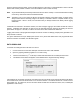
RUNNING THE GRAPHING SOFTWARE With the RHT10 inserted in the PC’s USB port, double-click the Datalogger Graph icon to launch the program. The opening screen will appear as shown below. Press “Connect” to open the main screen, Press “About” to view the version number, Press “View File” to open an existing file, Press “Quit” to close the program. 4 RHT10-EN v4.
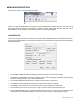
MENU BAR DESCRIPTION The main menu for the software appears as follows: From left to right the MENU BAR icons represent DATA DOWNLOAD, LOGGER SETUP, FILE OPEN, FILE SAVE-AS, FILE PRINT, VIEW ALL, and ZOOM. In addition, the FILE, VIEW, LINK, and HELP pull-down menus are available here. All of these functions are described in the following paragraphs. LOGGER SETUP Click on the computer icon on the menu bar (2nd from left) or select LOGGER SET from the LINK pull-down menu.
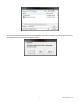
Once the changes have been made, click on the SETUP button to save them. Press the DEFAULT button to set the RHT10 back to factory default conditions. Press the CANCEL button to abort the setup. Note: Any stored data will be permanently erased when the user clicks on Setup. To save the data before creating a new setup, click Cancel and then download the data. Note: The battery may run out before the RHT10 has finished collecting a specified number of sample points.
In the screen below press VIEW to see the data graphically. If there are no readings currently stored in the RHT10, the program will let the user know via a warning screen. 7 RHT10-EN v4.
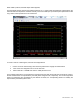
When VIEW is pressed, the Data Graph window appears, The Data Graph window presents the transferred data in an x-y graph format with Date/Time represented on the horizontal axis and Temperature / Relative Humidity / Dew Point / Grains per pound GPP (with optional RHT10-SW only) / Alarm Limits represented on the vertical axis: To zoom in and out of data regions, there are several approaches: 1. Use the mouse to click and drag a box around any data area to magnify the selected area. 2.
To customize the graph window select SHOW TRACES, BACKGROUND, GRID LINES, and MASK POINTS from the VIEW pull-down menu. These options provide the following features: SHOW TRACES: Allows the user to select which data to view as a trace (Temperature & Alarms). BACKGROUND: Select background color scheme. GRID LINES: Add or remove grid lines from x and y axes. MASK POINTS: Places dots on the traces for the actual data points, breaking up the continuous nature of the trace.
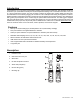
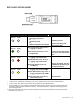
RHT10 LED STATUS GUIDE LEDs Record Record Meaning Alarm Alarm Action No LEDs flashing -No logging in process Or -No battery found Or -Battery completely discharged Alarm Alarm To start, Hold the start button until Green and Yellow LED flash Red single flash every 10 sec. * -Logging, low alarm for RH Red double flash every 10 sec. ‡ -Logging, high alarm for RH Red single flash every 60 sec. - Low Battery † Record Replace the battery and download the data Green single flash every 10 sec.
Specifications Overall Range Relative Humidity Accuracy (0 to 20 and 80 to 100%) ±5.0% Accuracy (20 to 40 and 60 to 80%) ±3.5% Accuracy (40 to 60%) ±3.0% Overall Range Temperature Dew Point Temperature 0 to 100% -40 to 158oF (-40 to 70oC) Accuracy (-40 to -10 and +40 to +70oC) ±2oC Accuracy (-10 to +40oC) ±1oC Accuracy (-40 to +14 and 104 to 158oF) ±3.6oF Accuracy (+14 to 104oF) ±1.8oF Overall Range Accuracy (25oC, 40 to 100%RH) -40 to 158oF (-40 to 70oC) ±4.
Battery Replacement It is highly recommended that the battery be replaced every 12 months, or prior to logging critical data. The RHT10 does not lose its stored readings when the battery weakens or when the battery is replaced; the data logging process will however be stopped and cannot be re-started until the battery has been replaced and the logged data has been downloaded to PC. Use only 3.6V lithium batteries. Before replacing the battery, remove the datalogger from the PC.
Warranty FLIR Systems, Inc. warrants this Extech Instruments brand device to be free of defects in parts and workmanship for three years from date of shipment (a six month limited warranty applies to sensors and cables). If it should become necessary to return the instrument for service during or beyond the warranty period, contact the Customer Service Department for authorization. Visit the website www.extech.com for contact information.
Garantía FLIR Systems, Inc., garantiza este dispositivo marca Extech Instruments para estar libre de defectos en partes o mano de obra durante tres años a partir de la fecha de embarque (se aplica una garantía limitada de seis meses para cables y sensores). Si fuera necesario regresar el instrumento para servicio durante o después del periodo de garantía, llame al Departamento de Servicio a Clientes para obtener autorización. Visite www.extech.com para Información de contacto.