
User`s guide


DO700 V1.0 8/09
16
Dissolved Oxygen (DO) Measurements
Preparation
• Remove the DO electrode from the solution bottle.
• Determine if the sponge inside the bottle is moist. If not, moisten the sponge but do not
allow excess water in the bottle.
• Small air bubbles are acceptable in the electrode but larger air bubbles should be
removed. To do so, remove the membrane cap and add electrolyte. Connect the
electrode to the meter and allow for a 15-minute polarization.
• Press the power key to turn on the meter (the DO indicator should appear).
• Press and hold
the ENTER key to select the desired unit of measure (mg/L, ppm, %);
then release.
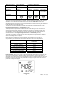
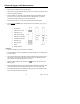
1. DO electrode
2. Calibration cover cap
3. Calibration cover
4. Water soaked sponge
5. Calibration cover bottom
6. Temperature electrode
7. Membrane cap
8. Cathode (gold)
9. Anode
10. Salinity electrode
Calibration
• Use the percentage (%) unit of measure for calibration.
• Press the CAL key to enter the Calibration mode (the flashing CAL icon will appear on
the meter’s LCD).
• Put the DO electrode into the calibration solution (calibration container that the probe
was housed in upon delivery) and tightly secure the cap of the calibration solution,
place vertically and allow polarizing for 3 to 5 minutes.
• When the reading stabilizes the smile face icon
appears on the LCD. Press the
CAL key again.
• The LCD will display a flashing ‘100%’ indicating that the calibration is complete. After
several seconds the meter will display ‘END’ and return to the measuring mode.
• If the displayed reading does not stabilize, polarize again per the Preparation section
above, and retry this calibration procedure.