
User Manual
LT40-EN v1.3 9/13
5
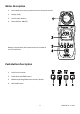
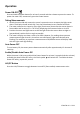
MAX/MIN Button
The meter can record the maximum, minimum, and average readings as described below:
1. Momentarily press the “MAX/MIN” button and the meter will begin to track the
maximum/average/minimum measurements; the “MAX” icon will display at the top of the
LCD window indicating that the meter is now showing the maximum reading. The reading
will not change until a higher reading is registered.
2. Press the “MAX/MIN” button again to switch from “MAX” to “AVG”, where the meter will
show the average measurement value. The “AVG” icon will be displayed above the displayed
value.
3. Press the “MAX/MIN” button again to change the mode from “AVG” to “MIN”, where the
meter will show the minimum value measured. The “MIN” icon will be displayed.
4. Press the “MAX/MIN” button again to switch from “MIN” back to “MAX”.
5. To exit this mode, hold the “MAX/MIN” button for at least 2 seconds. The MAX/AVG/MIN
icons should all be switched OFF when the unit returns to the normal operating mode.
Data ‘Hold’ Button
Press the HOLD button to freezes the current reading on the LCD. Press the HOLD button again
to release the reading.
CALIBRATION and ZERO Buttons
1000 LUX Calibration
1. Prepare a 2856
o
K/1000 Lux light source and face the meter’s sensor perpendicularly
toward the light source.
2. Simultaneously press and hold both the “CAL/ZERO” button and the power button for at
least 2 seconds.
3. Release the buttons when “CAL” is displayed on the LCD screen.
4. Press and hold the “CAL” button for 2 more seconds, and the LT40 will power down.
5. The meter is now calibrated.
ZERO Calibration
1. Ensure that the protective cover is attached to the light sensor.
2. Power the meter and the LCD should display ‘0’.
3. Momenarily press the “ZERO” button for the zero adjustment and the CAL icon will
switch ON.
4. The CAL icon will switch OFF when the calibration has been completed.
5. If the protective cap is not covering the sensor when the ZEO calibration is started the
LCD display will read “CAP”. In this case, please cover the sensor with the cap and restart
this procedure.