User's Guide Digital LCR Meter Model LCR200 D
Introduction Congratulations on your purchase of Extech's Model LCR200 LCR meter. This meter will accurately measure capacitors, inductors and resistors using the test frequencies of 100Hz, 120Hz 1 kHz, 10 kHz and 100 kHz. The dual display will simultaneously display the associated quality factor, dissipation or phase angle value using a series or parallel equivalent circuit. This meter is shipped fully tested and calibrated and, with proper use, will provide years of reliable service.
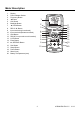
Meter Description 1. 2. 3. 4. 5. 6. 7. 8. 9. 10. 11. 12. 13. 14. 15. 16. 17. 18. 19. 20.
Operation Setup 1. 2. 3. Press the Power button to turn the meter on. The meter will turn on in the default mode: AUTO LCR and 1kHz APO will be active with auto shutoff every 5 minutes unless an AC adaptor is used. LCR primary parameter selection 1. The meter will turn on with auto parameter selection enabled and with the ”APO” (auto power off), “Auto” (autoranging) and “LCR” (auto-parameter) icons appearing at the top of the display. 2.
Relative / % Function The REL/% mode allows for % deviation measurements from a stored reference value. 1. Setup the meter with the parameters required for the test to be performed. 2. Insert the reference component into the test fixture and wait for a stable reading. 3. Press the REL/% button to store the value. The ∆ icon will appear in the display. 4.
Open/Short Calibration In order to improve the accuracy for high/low impedance measurements, it is recommended to do OPEN/SHORT calibration mode before the measurement. This removes stray impedances in test leads or fixtures. 1. Press the CAL button for greater than 2 seconds to start the open/short calibration procedure : 2. The “CAL” icon and “OPEn” appear in the display 3. With no component connected, press the CAL button.
Battery Replacement The battery icon indicates the status of the 9V battery. A fresh battery will have three lines above it. As the battery weakens, the number of lines will decrease. When the battery becomes too weak to power the meter, “batt” will appear in the display and the meter will shut down. To replace the battery: 1. Remove the two screws holding the rear bottom battery cover. 2. Remove and replace the 9V battery 3.
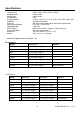
Specifications Display Test frequency Dissipation factor Quality factor θ measurement Sorting tolerance Calibration Power off Operating temperature Operating humidity Power Supply Power consumption Dimension Weight LCD size: 66.8 X 52.8mm (2.6 x 2.1”) backlit LCD 100Hz, 120Hz, 1KHz, 10 KHz, 100KHz 0.000 to 1999 0.000 to 1999 ± 90° ± 0.25%, ± 0.5%, ± 1%, ± 2%, ± 5% ± 10%, ± 20%, +80% -20% Open/Short calibration Auto shut off saves battery life or manual off by push button 0°C to 50°C (32 to 122°F) < 85% R.
Range Accuracy Accuracy 10kHz 100kHz 20Ω ± ( 1.0%rdg + 5digits ) ± ( 2.0%rdg + 5digits ) 200Ω ± ( 0.5%rdg + 5digits) ± ( 0.5%rdg + 5digits ) 2kΩ ± ( 0.5%rdg + 5digits ) ± ( 0.5%rdg + 5digits ) 20kΩ ± ( 0.5%rdg + 5digits ) ± ( 0.5%rdg + 5digits ) After calibration 200kΩ ± ( 0.5%rdg + 5digits ) ± ( 0.5%rdg + 5digits ) 2MΩ ± ( 1%rdg + 5digits ) ± ( 2.0%rdg + 5digits ) After calibration 20MΩ ± ( 2.
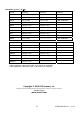
Inductance ( Lp/Ls ) : D ≦0.1 Range Accuracy Accuracy 100Hz/120Hz 1000Hz Remark 20uH ± (1% + 5d ) ± (1% + 5d ) After calibration 200uH ± (1% + 5d ) ± (1% + 5d ) After calibration 2000uH ± (0.8% + 5d ) ± (0.8% + 5d ) 20mH ± (0.5% + 5d ) ± (0.5% + 5d ) 200mH ± (0.5% + 5d ) ± (0.5% + 5d ) 2000mH ± (0.5% + 5d ) ± (0.5% + 5d ) 20H ± (0.5% + 5d ) ± (0.5% + 5d ) 200H ± (0.5% + 5d ) ± (0.