
User Manual


HDV600-EN v2.8 08/13
5
Operation
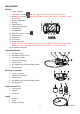
1. Connect the probe to the monitor.
2. Press the Power button to turn the monitor on.
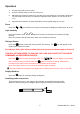
3. Maneuver the probe into position to view the area to be examined. The probe can be bent
into the shape of the area to be examined. Optimum focus distance is 2 to 6cm (0.79 to
2.3”)
4. Optimum focus distance is probe dependent, but the typical range is 2 to 6cm
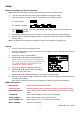
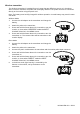
Zoom
Press the or zoom buttons to increase or decrease the display resolution from 1X to 2X.
Light Intensity
Press and release the or buttons to increase or decrease the camera LED light
intensity
Note: the camera LEDs become warm when set to maximum intensity
Taking a Picture
Press the button to take and store a picture into memory. The icon will appear on the
display when a picture is taken.
Recording a Video (this will now allow picture-in-picture and frame capture features)
THIS WILL BE REWORDED TO EXPLAIN THE LONG AND SHORT BUTTON PRESS
COMMANDS AS DESCRIBED EARLIER…
Press the button to start recording a video. The icons will appear on the display
when a video is being recorded. Press the button to stop the recording. Audio will be
recorded on the video via the microphone on the bottom of the monitor.
Note: The bottom access cover must be removed for audio recording.
The IP67 waterproof rating does not apply when the bottom panel access cover is removed.
Display Rotation
Press the button to rotate the display 90 degrees.
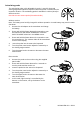
Installing probe accessories
Three accessories (mirror, anti-snag tip and magnet) are supplied with each probe.
Attach the accessory by unscrewing the probe ring and screwing on the attachment.