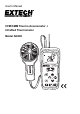
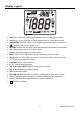
User's Manual CFM/CMM Thermo Anemometer + InfraRed Thermometer Model AN200 cf m/cmm Anemometer Thermometer AN200 UNITS NEXT AREA PROBE TEMPERATURE RECALL
Introduction Congratulations on your purchase of the Extech AN200 CFM/CMM Thermo Anemometer with InfraRed Thermometer. This instrument measures Air Velocity, Air Flow (volume), Air Temperature (with probe) and Surface Temperature (with the InfraRed function). The large, easyto-read backlit LCD includes primary and secondary displays plus numerous status indicators. The InfraRed feature includes a laser pointer for convenient targeting.
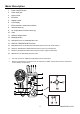
Meter Description 1. Power ON/OFF button 2. Probe input jack 3. Laser pointer 4. IR Sensor 5. Rubber holster 6. LCD Display 7. IR thermometer measurement button 8. Airflow buttons (4) 9. Air Temperature function buttons (2) 10. Vane 11. Airflow Average button 12. Backlight button 13. MAX‐MIN button for TEMPERATURE mode 14. HOLD for TEMPERTAURE functions 15. MAX‐MIN button for AIR VELOCITY/AIR FLOW (also used as left arrow button) 16.
Keypad • Press to turn the meter ON or OFF • IR + Laser Pointer Press and hold to measure. • MAX/MIN (Airflow) Record and store the highest and lowest airflow or velocity readings. ◄ (LEFT) also serves as change decimal point button in AREA mode • UNITS Press to select the mode of operation. In FLOW mode, the meter displays air volume. In VELOCITY mode, the meter displays air speed. ▲ (UP) also serves as increase number button in AREA mode. • HOLD Press to freeze the displayed reading.
Display Layout MAX (top of LCD): Max Hold function engaged for the Air Temperature function HOLD (top of LCD): Data Hold function engaged for the Air Temperature function PROBE TEMP: Reminder that the top LCD digits represent Air (Vane) Temperature : Indicates that the laser pointer is on.
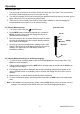
Operation Connecting the Vane 1. The vane plug is inserted in the meter’s sensor jack at the top of the meter. The plug and jack are keyed so that the plug can only fit in the jack one way. 2. Turn the plug carefully until it lines up with the jack and then firmly push the plug in place. Do not apply undue force or try to twist the plug side-to-side. 3. If the vane is not connected to the meter or if the sensor is defective, the LCD display will indicate dashed lines in place of an air velocity reading.
Air Flow Measurements (CMM / CFM) 1. Turn on the meter using the 2. Press the UNITS button to select the desired air flow units: CMM (cubic meters per minute) or CFM (cubic feet per minute). NOTE: At power up the meter will display the last unit of measure previously entered. 3. 4. ON/OFF button 2 Side view of Vane Arrow 2 To begin entering the area in m or ft , press and hold the AREA button until it beeps twice. The leftmost digit of the bottom display will begin to flash.
Data Hold (Air Velocity/Air Flow) 1. While taking measurements, press the HOLD button to freeze the air velocity/air flow reading for later viewing. 2. The HOLD indicator will appear in the bottom of the LCD display. 3. Press HOLD again to return to normal operation. MAX/MIN/AVG Record (Air Velocity/Air Flow) This allows the user to record and view the highest (MAX), lowest (MIN) and average (AVG) readings. The AVG indicator and RECORD indicator along with 1. Press the Airflow MAX/MIN button.
InfraRed (Non-Contact) Temperature Measurements 1. The IR sensor is located at the top of the meter. 2. Point the sensor toward the surface to be measured. 3. Press and hold the red IR button to begin measuring the surface temperature of a desired target. IR TEMP and will appear on the display. The laser pointer will switch on to help aim the meter. 4. The measured IR surface temperature will appear at the center of the LCD (larger digits).
Specifications Air Velocity Range Resolution Accuracy m/s (meters per sec) 0.40 - 30.00 m/s 0.01 m/s ± (3%rdg + 0.20 m/s) km/h (kilometers/hour) 1.4 - 108.0 km/h 0.1 km/h ± (3%rdg + 0.8 km/hr) ft/min (feet per minute) 80 – 5900 ft/min 1 ft/min ± (3%rdg + 40 ft/m) mph (miles per hour) 0.9 – 67.0 mph 0.1 mph ± (3%rdg + 0.4 MPH) knots (nautical MPH) 0.8 to 58.0 knots 0.1 knots ± (3%rdg + 0.4 knots) Range Resolution Area 0.1 0 to 999.
InfraRed Measurement Considerations When taking IR measurements the meter automatically compensates for ambient temperature changes. Note that it may take up to 30 minutes to adjust to extremely wide ambient changes. Low temperature measurements quickly followed by high temperature measurements may require several minutes to stabilize as a result of the IR sensor cooling process. If the surface of the object under test is covered with frost, oil, grime, etc., clean before taking measurements.
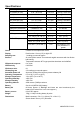
Thermal Emissivity Table for Common Materials Material Emissivity Material Emissivity Asphalt 0.90 to 0.98 Cloth (black) 0.98 Concrete 0.94 Human skin 0.98 Cement 0.96 Leather 0.75 to 0.80 Sand 0.90 Charcoal (powder) 0.96 Earth 0.92 to 0.96 Lacquer 0.80 to 0.95 Water 0.67 Lacquer (matt) 0.97 Ice 0.96 to 0.98 Rubber (black) 0.94 Snow 0.9 Plastic 0.85 to 0.95 Glass 0.85 to 1.00 Timber 0.90 Ceramic 0.90 to 0.94 Paper 0.70 to 0.94 Marble 0.94 Chromium oxides 0.
Useful Equations and Conversions Area equation for rectangular or square ducts Height (H) Area (A) = Width (W) x Height (H) Width (W) Area equation for circular ducts Area (A) = x r2 Where = 3.14 and r2 = radius x radius Radius Cubic equations CFM (ft3/min) = Air Velocity (ft/min) x Area (ft2) CMM (m3/min) = Air Velocity (m/sec) x Area (m2) x 60 NOTE: Measurements made in inches must be converted to feet or meters before using the above formulae.