
Printer User Manual


Chapter 1 Installation and Initial Power-Up
Page 11
Tear and discard any paper remaining in the printer tray.
Remove any paper remaining in the printer mechanism, using the <FEED> switch.
Do not REVERSE pull paper out of the printer mechanism - this will damage
the printer mechanism
Feed the new roll of paper into the printer paper slot using the <FEED> switch.
1.7.2 INSTALLING RIBBON
Remove the back cover (section 1.1 and figure 1.3).
Remove the worn ribbon by pressing with one finger at the location labeled
"EJECT" on the ribbon cartridge.
Insert the new ribbon in place and press at the extreme ends of the ribbon
cartridge to secure it in place.
With your thumb, tighten the ribbon by rotating clockwise the ribbed wheel located
on the front of the ribbon cartridge.
Feed paper to insure that the paper passes through exposed ribbon and ribbon
cartridge case.
1.8 INITIAL POWER-UP AND SELF-TEST
A self-test feature is built into your MSP/MPP compact printer series. To start the self-test,
press the <FEED> switch during initial power-up of the printer (see below).
Once the battery is installed and all the front panel LED indicators are turned off (press the
<OFF> or <SET> switch to turn off) press and hold down the <FEED> switch, then press the
<SLCT> or <ON> switch, this will automatically start the self test. The self-test program checks
the integrity of the operating program installed, the 2048 character print buffer, the processor
watchdog, and the power supervision circuits. The printer performs an internal self-test and
prints the self-test findings, current printer settings, and starts continuous print of the built-in
printer character fonts. To stop the self-test process, press the <FEED> switch.
If no problems are found, the following messages are printed:
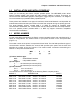
TEST PRINT DESCRIPTION
2K BUFFER EXTECH V2.2 (C) 1994 This line shows the version of the installed Eprom
and the size of print buffer.
INTERFACE: SERIAL Type of interface selected SERIAL or PARALLEL.
MODE:2400,8,N,1 Baud=2400, number of Data bits=8, Parity= None,
Stop bits = 1
Note:
The red <Error> LED will turned on if any error is encountered during self test.
If any problem is encountered during self test. Refer to APPENDIX C for a brief trouble shooting
guide.