
User Manual


DL160 V1.1 01/110
3
Description and Button Functions
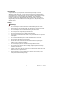
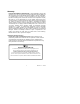
1. LCD Description
Auto power off (does not apply
when recording), the meter will
automatically shuts off after 5mins
without any button presses.
REC: Recording status. After the record
mode is set up by the software,
press the START/STOP button for more than 4 seconds to begin
recording. This icon will be displayed and indicates the meter is
recording data. Press the same button again for more than 4
seconds to stop recording.
Record until full is selected. When the memory is full, the
datalogger will stop recording.
Continuous recording is selected. When the memory is full, the
data will overwrite the oldest data.
FULL Memory full and recording has stopped.
Battery status, when completely filles in (black) the battery power
is full. When there is only one section filled in, the battery is
exhausted and should be replaced with a new one.
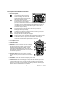
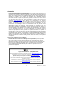
2. AC adaptor Jack
3. ON/OFF Button
4. MAX/MIN : Press the button one time to display
the MAX (maximum) reading . Press again to
display the MIN (minimum) reading. A third
press will exit MAX/MIN mode. The meter will
automatically exit MAX/MIN mode in 10 seconds
if no button is pressed.
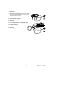
5. CH Input Jacks: Insert the current or voltage
sensor to these ports to measure and record the
data.
6. CHANNEL: Select the channel for display on the LCD
7. START/STOP: After the datalogger is setup from the software, press the
START/STOP button for 4 seconds to begin recording. Press the button
again for 4 seconds to stop recording. Recording cannot be started again
until the data is downloaded to the software.