User Manual Carbon Monoxide (CO) and Carbon Dioxide (CO2) Meter With Air Temp/RH Measurements and Dew Point/Wet Bulb calculations Model CO260 Additional User Manual Translations available at www.extech.
Introduction Thank you for selecting the Extech CO260 Meter. The CO260 measures CO2 (Carbon Dioxide) levels, CO (Carbon Monoxide) levels, air temperature, and relative humidity. The CO260 also displays dew point and wet bulb temperatures, generated from calculations performed on temperature and humidity measurements. The CO260 is an ideal instrument for indoor air quality (IAQ) analysis. This device is shipped fully tested and calibrated and, with proper use, will provide years of reliable service.
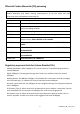
Effects of Carbon Monoxide (CO) poisoning Warning: Ensure that the meter is powered, at room temperature, and in an area free of Carbon Monoxide (CO) before starting measurements. If not, the meter will read incorrectly when subsequently measuring CO.
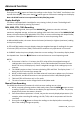
Descriptions METER 1. Temperature and Humidity sensor 2. Primary display 3. Secondary display 4. Power and Set button 5. Start and Escape button 6. Mode and Recall button 7. Min-Max-Avg and Enter button 8. Memory and Down button 9. CO and CO2 sensors (on rear of meter) 10. Hold and Up button 11.
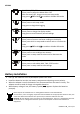
KEYPAD POWER ON/OFF, SET Short press to power the Meter ON or OFF With the meter OFF, long press to enter setup mode Long press /SET and H/ to enable or disable APO mode START/ESCAPE Short press to exit setup mode Long press to begin data logging MODE/RECALL Short press to change the display modes Long press to recall manually stored readings HOLD/UP ARROW Short press to freeze or unfreeze reading on the display Short press while in setup mode to select units or increase the value Long press /SET and H/ t
Powering the Meter Short press the /SET button to turn the meter ON or OFF. At power up, the meter emits a short beep and performs a 30-second warmup before entering normal operating mode. After the countdown, the primary LCD will display the current readings. The secondary display will alternate between the current date and time. Taking Measurements The meter begins measuring in the selected mode, when powered on, and the sensor responds every 1 second.
Advanced Functions Data Hold Short press the H/ button to freeze the readings on the display. The "HOLD” icon flashes in the top left of the display. Short press the H/ button again to unfreeze the readings on the display. Note: the HOLD function is not operational in Min/Max/Avg mode. Display Backlight The meter is equipped with a backlight for easy viewing in dimly lit areas. The backlight will activate for 10 seconds by pressing any button.
Note: The manual recording mode is not operational in Min/Max mode. Recalling Manually Stored Readings The meter can recall up to 99 previously saved readings. 1. While in normal operating mode, long press the M/RCL button until ‘Recall’ flashes on the display. 2. Short press the H/ or MEM/ buttons to scroll through the memory locations. The selected memory location will flash for approximately 3 seconds and then the stored reading will display on the screen. 3.
Setup Mode While the meter is OFF, long press the /SET button to enter the setup mode. To exit the setup mode, short press the /ESC button at any time during setup. P10 Clearing the Manual Recording Memory Clearing the memory will erase ALL the manually stored records. 1. Upon entering setup mode, P10 and “CLr” display on the LCD. 2. Short press the MXMN/AV/ button to advance to P11 and make a selection. 3. Short press the H/ or MEM/ button to select YES or NO.
6. 7. 8. 9. Short press the MXMN/AV/ button to save the setting and advance to the second setup. Short press the MXMN/AV/ button to save the settings and return to P40. Short press the /ESC button to exit without saving. Short press the H/ button to advance to the next step. Note: The datalogging sampling range is from 1 second to 4 hours 59 minutes 59 seconds. P50 Changing the Barometric Pressure Compensation 1. 2. 3. 4. 5. 6. When in pressure setup mode, P50 and “PrES” display on the LCD.
33% Calibration 1. Plug the sensor probe into the 33% salt bottle. 2. Long press the /ESC, MEM/ and mode. 3. In calibration mode, “CAL” and the current value (32.8% if at 25°C) will blink on the LCD. 4. The meter is now calibrating, and will finish in about 60 minutes, when the current value stops blinking. “CAL” will continue to blink on the display. 5. To abort the calibration, power the meter OFF at any time. /SET buttons simultaneously to enter calibration 75% calibration 1.
Specifications Function CO2 CO Temperature Humidity Wet Bulb Dew Point Range Resolution Accuracy 0 to 5000ppm 1 ppm ±(5%rdg + 30ppm) 5001 to 9999ppm 1 ppm Not specified Pressure dependence: +1.6% of reading per kPa deviation from normal pressure (100kPa) <100 ppm 1 ppm ±(10ppm) 101 to 500 ppm 1 ppm ±(10%rdg) 501 to 1000 ppm 1 ppm ±(20%rdg) -20 to 60°C 0.1° ±0.6°C -5 to 140°F 0.1° ±0.9°F ±3%(10 to 90%) @25°C 0.1 to 99.9% 0.1%RH ±5%(all other ranges)@25°C -5 to 59.9°C 0.
Troubleshooting Error Problem Solution Ensure that batteries are properly installed with correct polarity Display No display when pressing power button Display Readings frozen on display Display Slow Response E01/E33 E02 E03 E04 E11 E16 E31 E32 E33 E33 CO2 sensor is not working Measurement is below the range of the meter Measurement is above the range of the meter Data error Humidity calibration Error CO calibration error A/D or temperature sensor failure Memory failure A/D or humidity sensor fail