
User Manual

EN-US English
1
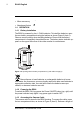
cable as required and snap the housing shut. To store the cable after use:
open the housing, coil the cable inside the housing, and snap the housing
closed.
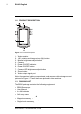
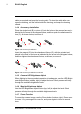
1.4.4 Accessory Installation
Place the single hook (B) or mirror (A) into the hole on the camera lens as in-
dicated by the arrow in the diagram below, and then push the attachment fix-
ture (C), as shown below, to secure it.
Figure 1.3 Accessory Installation
Insert the magnet (E) into the attachment fixture (D), with the pointed end
placed in the hole on the lens as indicated by the arrow in the diagram below,
and then tighten the attachment fixture, as shown, to secure it.
Figure 1.4 Accessory Installation continued
1.4.5 Camera LED Brightness Adjust
When lighting in the area under inspection is inadequate, use the LED Bright-
ness Adjust button (middle, right) to adjust the level. Short presses will step
through the available brightness levels.
1.4.6 Monitor Brightness Adjust
Use the LED Brightness Adjust button (top, left) to adjust the level. Short
presses will step through the available brightness levels.
1.4.7 Zoom Function
To zoom the camera image, use the Zoom button (bottom, right). Press once
to zoom 1.5x, press again to zoom 2x, and press again to return to normal
view.
#NAS100023; r. AC/63396/63396; en-GB
4