USER GUIDE Large Vane CFM/CMM Thermo-Anemometer Model AN300
Introduction Congratulations on your purchase of the Extech AN300 Vane Airflow Anemometer. This instrument measures Air Velocity, Air Flow (volume), and Air Temperature. The large, easyto-read backlit LCD includes primary (upper) and secondary (lower) displays plus numerous status indicators. The optional cone and funnel airflow adaptors allow for quick volume measurements. This meter is shipped fully tested and calibrated and, with proper use, will provide years of reliable service.
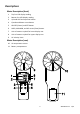
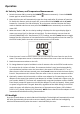
Descriptions Meter Description (front) 1. Top line LCD display reading 2. Bottom line LCD display reading 3. U/mode AVG and up arrow button 4. L/mode and down arrow button 5. ON-OFF (Power) and SET button 6. HOLD, MAX-MIN, and left arrow (Enter) button 7. Unit of measure symbol for lower display row 8. Unit of measure symbol for upper display row 9. Air Velocity Vane Meter Description (rear) 10. Air temperature sensor 11. Battery compartment 3 AN300-EN v1.
Brief Keypad Description Press momentarily to switch the meter ON or OFF. Press and hold this button for 2 seconds to enter or exit the Setup mode (refer to SETUP mode section for details).
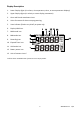
Display Description 1. Lower Display digits (air volume, air temperature, timer, or menu parameter displays) 2. Upper Display digits (air velocity or menu display parameters) 3. Cone and Funnel attachment icons 4. Units of measure for duct area programming 5. Vane indicator (flashes very briefly on power up) 6. Display HOLD icon 7. MAX mode icon 8. MIN mode icon 9. Recording icon 10. Elapsed Timer icon 11. AVG mode icon 12. Battery status icon 13. Unit of measure icons* *Full list shown.
Operation Air Velocity, Volume, and Temperature Measurements 1. Switch the meter ON by pressing the POWER button again to switch the meter OFF. button momentarily. Press the POWER 2. Note that the meter will automatically enter the sleep mode after 20 minutes of inactivity. To disable this feature: with the meter OFF, press and hold the POWER and the U/mode buttons for 2 seconds. The LCD will display 'n' as the meter switches ON.
Data Hold Mode 1. Press the HOLD button from the normal operating mode to freeze the current measurement. 2. The ‘HOLD’ icon will appear at the top of the LCD display. 3. Press HOLD again to return to normal operation. The ‘HOLD’ icon will switch OFF and the meter will return to displaying readings in real time. MAX/MIN Mode The MAX-MIN feature records the highest (MAX) and lowest (MIN) readings captured since the MAX-MIN mode was accessed. 1.
Setup Mode Entering Setup Mode Press and hold the SET button for 2 seconds to enter Setup mode. Two options are available: P1.0: Unit and P2.0: AREA. Use the up/down buttons to toggle between P1.0 UNIT and P2.0 AREA options. P1.0: Unit Selection 1. Once in setup mode, at the P1.0 UNIT display, momentarily press the HOLD button to enter the P1.0 UNIT menu. 2. Use the down/up arrow buttons to switch between metric and imperial units.
Battery Replacement When the low battery icon appears on the LCD, the four (4) 1.5V ‘AAA’ batteries must be replaced. 1. Open the rear battery compartment by carefully pulling down on the compartment’s latch. 2. The battery compartment cover should be completely removed before proceeding. 3. Replace the four (4) 1.5V ‘AAA’ batteries ensuring proper polarity. 4. Close the battery compartment before attempting to use the meter. Battery Safety Reminders o o Never dispose of batteries in a fire.
Specifications Air Velocity m/s (meters per second) fpm (feet per minute) Air Flow (Volume) Range Resolution Accuracy 0.2 - 30 m/s 0.01 m/s ± (1.5% rdg + 0.3 m/s) 40 – 5900 fpm 1 fpm ± (1.5% rdg + 59 fpm) Range Resolution Area Range 0-99999 m /min CFM (cubic ft/min) 0-99999 ft /min Air Temperature 0.1 up to 9999.9 3 CMM (cubic meters/min) then 1.0 0.1 up to 9999.9 3 then 1.0 Range Resolution 0 to 99999cm 2 2 0 to 99999in Accuracy ± 1.1°F (-5 to 122°F) ± 2.
Error Messages Error codes and solutions Air Temperature E02: Temperature reading is lower than the low range limit. Place the meter in room temperature for 30 minutes. If E02 continues, send the unit to Extech for repair. E03: Temperature exceeds the high range limit. Place the meter in room temperature for 30 minutes. If E03 continues to appear, send the unit to Extech for repair. E31: The A-to-D converter requires replacing. Send the meter to Extech Instruments for repair.
Appendix: Useful Equations and Conversions Area equation for rectangular or square ducts Height (H) Area (A) = Width (W) x Height (H) Width (W) Area equation for circular ducts Area (A) = pi x r2 Where pi = 3.14 and r2 = radius x radius Radius Cubic equations CFM (ft3/min) = Air Velocity (ft/min) x Area (ft2) CMM (m3/min) = Air Velocity (m/sec) x Area (m2) x 60 NOTE: Measurements made in inches or centimeters must be converted to feet or meters before using these formulae.
Warranty FLIR Systems, Inc. warrants this Extech Instruments brand device to be free of defects in parts and workmanship for one year from date of shipment (a six month limited warranty applies to sensors and cables). If it should become necessary to return the instrument for service during or beyond the warranty period, contact the Customer Service Department for authorization. Visit the website www.extech.com for contact information.
Garantie FLIR Systems, Inc. garantit que cet appareil Extech Instruments est exempt de défauts matériaux et de fabrication pendant un an à partir de la date d’envoi (une garantie limitée de six mois s’applique aux capteurs et aux câbles). Si le renvoi de l’appareil pour réparation devient nécessaire durant ou après la période de garantie, contactez le service client pour autorisation. Pour obtenir les coordonnées, visitez le site Web suivant : www.extech.com.
Garantía FLIR Systems, Inc., garantiza este dispositivo marca Extech Instruments para estar libre de defectos en partes o mano de obra durante un año a partir de la fecha de embarque (se aplica una garantía limitada de seis meses para cables y sensores). Si fuera necesario regresar el instrumento para servicio durante o después del periodo de garantía, llame al Departamento de Servicio a Clientes para obtener autorización. Visite www.extech.com para Información de contacto.