User's Guide IR Thermometer Printer / Datalogger with External Contact Probe Model 42582 F1 F2 F3 F4 ON/O FF Line Feed Introduction Congratulations on your purchase of the Extech 42580 IR Thermometer Printer-Datalogger. This device measures temperature with the non-contact IR sensor and the external contact probe. The built-in Datalogger feature stores up to 12,000 readings. The readings can be displayed directly on the meter or can be for transferred to a PC.
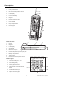
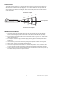
Description Meter Front Panel 1. Laser pointer beam 2. Non-contact temperature sensor 1 3. LCD Display 2 4. Function Softkeys 5. Keypad 6. External Contact Probe 7. Probe Handle 8. Paper compartment 9. Printer paper 3 F1 F2 F3 4 F4 6 5 ON/OF F Line Feed 7 8 9 Meter Side View 1. Printer 2. Keypad 3. LCD Display 4. AC Adapter 1 4 6 5 5. RS-232c TTL jack 6. External temperature probe input jack 7. Battery compartment 8. Tripod mount 9.
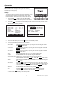
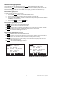
Operation Press the ON/OFF button to power the meter. The WELCOME screen will appear along with four softkey selections (F1 through F4): Setup Two setup screens provide access to the Emissivity, LCD Contrast, Printer Contrast, Temperature Units, Laser Pointer ON/OFF, Auto Power OFF, Clock, and user ID. 1. Press the F4 SET softkey from the WELCOME screen to access the first setup screen. See below. 2. Press F4 NEXT to access the second setup screen from the first setup screen.
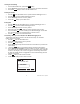
IR non-contact Measurements 1. Turn the instrument ON. 2. Press the F1 MEAS softkey from the WELCOME screen to enter the measurement mode 3. Point the meter at the surface to be measured. 4. Press and hold the ON button to take a reading while pointing toward the target. 5. Press F3 LASER during measurements to turn the laser pointer ON or OFF. The icon appears when the laser is on. Note that if the Laser is disabled in the SETUP mode, it will not light.
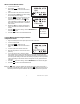
Manual Datalogging Mode This instrument has two datalogging modes, MEM Manual Datalogging (99 records maximum) and LOG Automatic Datalogging (12,000 records maximum). Data saved in the Manual Datalogging mode can be recalled in the display, printed or transferred to a pc. Manual Datalogging basics To take a reading and store it in memory: 1. Press the F2 MEM softkey from the WELCOME screen. 2. Use the arrow buttons to select a memory location (1 through 99). 3.
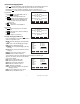
Viewing Stored Readings 1. From the WECLOME screen, press the F2 MEM softkey 2. Use the Arrow keys to scroll through the memory locations and view the stored data. 3. Press the F1 EXIT softkey to return to the WELCOME screen. Printing Stored Data 1. Press F2 MEM from WELCOME screen to proceed to Manual Datalogger screen 1. 2. Press F4 NEXT to proceed to Manual Datalogger screen 2. 3. Use the Arrow keys to scroll to a memory location 4. Use the F3 PRN softkey to print a data record.
Automatic Datalogging Mode In the LOG Automatic Datalogging mode the Model 42580 can automatically measure and store 12,000 readings at a programmed sample rate. Data saved in the Automatic Datalogging mode can be recalled in the display, printed or transferred to a PC. Press the F3 LOG softkey from the WELCOME display to access LOG screens 1 and 2: Log Screen 1 Press F3 LOG from the WELCOME screen to access LOG SCREEN 1.
To edit the fields in datalogger SETUP Screen1: 1. Use the up and down arrow keys to scroll through the parameters. 2. When a parameter is highlighted, use the F2 EDIT softkey to open it for editing. 3. Use the alphanumeric keypad to edit the parameter. 4. Press the F4 ENTER softkey to save changes. Press F1 ABORT to cancel changes. 5. Press the F1 EXIT softkey to return to the SETUP screen. Recording Data in the Automatic Datalogging Mode 1.
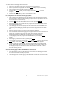
Field of View The meter’s field of view is 8:1, meaning that if the meter is 8 inches from the target, the diameter of the measurement spot (target) is 1 inch. Other distances and spot sizes are shown below in the field of view diagram. Refer to the chart printed on the meter also for more information. Diameter of Spot 2” 1” 0.5” 4” Laser pointer 4” 8” 16” 32” Distance from Object IR Measurement Notes 1.
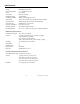
Specifications General Specifications Display Backlit Multi-function LCD Over range indication "-------" appears on the LCD Printer 38mm Printer PC Interface RS-232C (TTL level) Datalogger memory 12,000 readings Low battery indication Battery symbol appears on the LCD Power supply Four (4) 1.
Maintenance Cleaning Wipe instrument with damp cloth as needed. Do not apply solvents or abrasives to the meter. Store in a cool dry place with the batteries removed. Battery Replacement When the batteries weaken, the LCD display will dim or go completely blank. To replace the batteries, open the rear battery compartment and insert four (4) new 1.5V ‘AA’ batteries with correct polarity position.
Emissivity Considerations The amount of IR energy emitted by an object is proportional to an object's temperature and its ability to emit energy. This ability is known as emissivity and is based upon the material of the object and its surface finish. Emissivity values range from 0.1 for a very reflective object to 1.00 for a flat black finish. The 42580 senses IR energy and calculates the temperature based upon the amount of IR energy it receives using a factory default emissivity setting of 0.
Software System Requirements • Hardware Requirements: 486 PC or better with COM 1 and COM 2 Serial ports • Operating System Compatibility: Windows TM 95/98/NT/2000/XP Hardware Connection The IR Thermometer connects to a PC with the supplied DB-9 to 3.5mm mini-plug (mono) interface cable. The DB-9 end connects to the PC serial com port. The mini-plug end connects to the IR Thermometer. Software Installation The instructions on how to install the optional software are printed on the Software CD label.
Warranty EXTECH INSTRUMENTS CORPORATION warrants this instrument to be free of defects in parts and workmanship for one year from date of shipment (a six month limited warranty applies to sensors and cables). If it should become necessary to return the instrument for service during or beyond the warranty period, contact the Customer Service Department at (781) 890-7440 ext. 210 for authorization or visit our website www.extech.com for contact information.