
User`s guide


42582-EN v6.1 07/13
4
Operation
Press the ON/OFF button to power the meter. The
WELCOME screen will appear along with four softkey
selections (F1 through F4):
Setup
Two setup screens provide access to the Emissivity, LCD
Contrast, Printer Contrast, Temperature Units, Laser
Pointer ON/OFF, Auto Power OFF, Clock, and user ID.
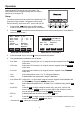
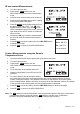
1. Press the F4 SET softkey from the WELCOME
screen to access the first setup screen. See below.
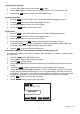
2. Press F4 NEXT to access the second setup screen from the first setup screen. Press Back to
return to setup screen 1.
3. Press the ▲or▼ key to move the 1 cursor to the desired position.
4. The programmable parameters are as follows:
• Emi. Rate: Adjust the emissivity (0.0 to 1.0) using the numeric keypad. Press F4 ENTER
when done.
• LCD Cont: Adjust the LCD contrast (1-5) using the numeric keypad. Press F4 ENTER
when done.
• Prn Cont: Adjust the print contrast (1-9) using the numeric keypad. Press F4 ENTER
when done.
• Unit: Select temperature units (°C or °F) using the F2 button.
• Laser: Enable/Disable the laser pointer using the F2 button
• Auto Power OFF: Adjust from 1 to 20 minutes using the numeric keypad. Enable/Disable with
the F2 EDIT key. Press F4 ENTER when done.
• Date: Select date format MM: DD:YY, DD:MM:YY or YY:MM:DD using the F2 EDIT
key.
• Set Clock: Press F2 EDIT to begin editing the month, day, year, hour, minute, and
second. Use the ENTER key to move from digit to digit. Use the numeric
keys to change the number. Press F4 ENTER when done.
• SET ID: Enable/Disable the ID feature using the F2 EDIT key.
• ID: Press F2 EDIT to begin entering a custom ID. Use the alpha-numeric keys to
create the ID. Press F4 ENTER when done.
• Press the F1 EXIT softkey to exit setup mode.
Emi. Rate: 0.95
LCD Cont. (1 - 5): 3
Prn Cont. (1 - 9): 5
Unit: C
Laser: Enable
Auto Off: 20 mins
Enable
o
EXIT EDIT NEXT
MAIN SETUP SCREEN 1
PRN
Set Clock:
HH:MM:SS
07-07-05 02:10:20
Set ID: Enable
ID: ACME CORP.
DD-MM-YY
EXIT
PRNEDIT BACK
MAIN SETUP SCREEN 2