USER MANUAL Dual Laser InfraRed (IR) Thermometer MODEL 42570
Introduction Congratulations on your purchase of the Model 42570 IR Thermometer. This Infrared thermometer measures and displays non-contact temperature readings up to 3992°F/2200°C (certified to 2000°F/1100°C). At 50”, built-in dual lasers converge to 1” target spot to insure accurate targeting and temperature measurement. Advanced features include a USB PC interface and software, 100ms response time, Max/Min/Ave/Diff displays adjustable emissivity and High/Low alarms.
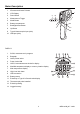
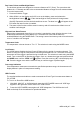
Meter Description 1. IR sensor and Laser Pointers 2. LCD Display 3. Down Button 4. Measurement Trigger 5. Mode Button 6. Battery compartment 7. Backlight/Laser Button 8. Up Button 9. Type K thermocouple input (side) 1 9 10 3 8 7 2 4 5 6 10. USB port (side) DISPLAY 1. SCAN, measurement in progress 2. Bargraph 3. Laser pointer active 4. Power locked ON 5. HOLD, last measurement locked in display 6. Max/Min temperature display or memory location display 7.
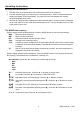
Operating Instructions IR Temperature Measurements 1. Hold the meter by its handle and point it toward the surface to be measured. 2. Pull and hold the trigger to turn the meter on and begin testing. “SCAN” and the temperature reading will appear on the large display. The upper and lower sub-displays will indicate values/settings previously used. 3. Release the Trigger and the reading will hold for approximately 7 seconds (“HOLD” will appear on the LCD) after which the meter will automatically shut off.
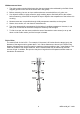
Dual Laser Pointer and Backlight Button The dual laser pointers are designed to cross at a distance of 50” (76cm). The spot size at this distance is a 1” diameter and this is the recommended distance to target for most measurements. To turn the lasers on/off: 1. Press and Hold the Trigger 2. While SCAN is on the display and LOG is not on the display, press and release the backlight/laser button ( ). Either the backlight or laser pointers will change status (On/Off).
Data Logger Storing Data: The thermometer is capable of storing up to 100 data points. Infrared: To store data from an infrared reading, 1. Pull and Hold the trigger 2. Press the MODE button until LOG appears in the lower left corner of the display; a log location number will be displayed. If no temperature has been recorded in the displayed LOG location, 4 dashes will appear in the lower right corner. 3. Aim the unit at the target area you want to record, and press the laser/backlight button.
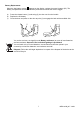
Battery Replacement When the low battery symbol appears on the display, replace the meter’s battery (9V). The battery compartment is located behind the panel that surrounds the meter’s trigger. a) b) c) Press the release button (1) and swing (2) the door out from the handle Replace the 9V battery Close the door and press on the door at point (3) to engage the latch with an audible click.
IR Measurement Notes 1. The object under test should be larger than the spot (target) size calculated by the field of view diagram (printed on the side of the meter and in this guide). 2. Before measuring, be sure to clean surfaces that are covered with frost, oil, grime, etc. 3. If an object's surface is highly reflective, apply masking tape or flat black paint to the surface before measuring. Allow time for the paint or tape to adjust to the temperature of the surface it is covering. 4.
Specifications Range -50 to 2200oC (-58 to 3992oF) (typical spec only >1000oC/1832oF) Resolution 0.1o < 1000 o, 1o ≥ 1000 o Accuracy -50°C to -23°C (-58°F to -10°F) ±7°C/14°F (Typical) -23°C to -2°C (-10°F to 28°F) ±4°C/8°F -2°C to 94°C (28°F to 200°F) ±2.5°C/4.5°F 94°C to 204°C (200°F to 400°F) ±(1.0%rdg + 1°C/2°F) 204°C to 426°C (400°F to 800°F) ±(1.