
User`s guide


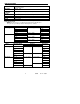
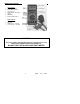
Table Of Contents
- User's Guide
- Resolution
- DC Voltage
- AC Voltage
- Resistance
- Power Measurements
- Attention: Transistor, capacitance and temperature measureme
- Input Terminals
- Transistor Socket hFE (PNP NPN)
- Attention: Never exceed the maximum input limits (1000VDC
- AC / DC Voltage Displays
- Attention: Never measure current in circuits where over 250
- Attention: Make sure all objects, circuits and components un
- Attention: During diode tests, ensure that components and ci
- Attention: Observe the max. input limits. Never connect volt
- POWER MEASUREMENTS
- Software for PC Interface
- Using the DOS Software
- Input Terminals
8 382860 Ver. 2.1 09/04
• mA-Measuring Socket
For DC/AC mA current measurements below 400mA, insert the Red test-lead
to this terminal.
• COM (Common or Negative Input Terminal
For all measurements, except capacitance, temperature and transistor
measurements, the Black test lead is connected here
• V/Ohm-Socket
For measurements of voltage, frequency, resistance, continuity, diode and
logic, insert the Red test lead into this terminal.
Advanced Function Information
Analog Bargraph: The Bargraph consists of 43 segments and responds faster than the
LCD. If the meter’s measuring range is exceeded, “OL” is displayed on the LCD and
the Bargraph segments will flash. An audible warning tone will sound for all functions
except resistance, diode, and temperature in an overload condition.
Data-Hold “D-H”: In this mode, you can freeze a reading in the center sub-LCD display.
Press the FUNCTION key then the SET/RESET keys to activate Data Hold. The
center sub-display will indicate the held reading. Press SET/RESET again to freeze
a new reading. Press the FUNCTION key to exit the Data Hold mode.
Range Hold “R-H”: Press the FUNCTION key twice then the SET/RESET key once to
access this mode. This function allows the user to switch off automatic range
selection (Auto Range) and set the measuring range manually. Each time the UP or
DOWN button is pressed, the decimal point is moved one position to the left or to
the right, the units of measure are changed respectively (e.g. from KHz to MHz
during frequency measurement). To return from this function mode, press the
SET/RESET key.
Auto Hold A-H: In this function, the meter will automatically record the MIN/MAX/AVG
readings taken since this mode was accessed. These values are continuously
updated. To access A-H, press the FUNCTION key three times. Then press the
SET/RESET key once. Use the UP and DOWN keys to select the decimal location
for the MIN/MAX/AVG readings. If you fixed the range using Range Hold R-H
(explained above), press the SET/RESET key once again. The MIN-value is shown
on the left sub-display, the MAX-value on the right sub-display, and the AVG on the
center sub-display. Press SET/RESET key to return to normal meter operation.
REL(Relative): The relative mode enables the operator to compare a pre-set reference
value (displayed in the right-most sub-LCD) to subsequent readings. Press the
FUNCTION key four times and then press the SET/RESET Key once. Set the
polarity of the reference value via the UP/DOWN keys. Press the SET/RESET key
when polarity is set. Use the UP/DOWN keys to set the desired reference value and
its decimal point (use the SET/RESET key to move through the digits. When a digit
is flashing it is ready to be changed via the UP/DOWN keys. Press the SET/RESET
key repeatedly until the digits cease flashing when editing is complete. Press the
SET/RESET key once more and the meter’s center sub-LCD will now display the
difference (offset) between the stored reference value and the actual readings, while
the present (actual) measurement displays on the Main LCD. The left sub-display
will show the difference in % and the right sub-display will continue to show the
preset reference value.