
User manual

Because the designs of computers are different, only general installation instructions are
given. Please refer your computer’s reference manual whenever in doubt.
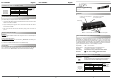
1. Connect the USB cable EX-K1552 to the USB B-female connector and lock the cable
with the screw of the EX-1166HMV.
2. Plug the included power supply into the 5V Connector and lock this also with the
screw of the EX-1166HMV.
3. Now connect the other end from the USB cable ( A-Plug) to the A-Connector at
your PC.
HARDWARE INSTALLATION :
6 5
EX
EX
EX
-
-
-
1166HMV
1166HMV
1166HMV
English
English
English
EX
EX
EX
-
-
-
1166HMV
1166HMV
1166HMV
English
English
English
1
Die EX-1166HMV ist ein USB 2.0 HUB für bis zu 4 Endgeräte. Er ist mit 4 Ports für
Endgeräte und 1 Port für den Anschluss an den PC ausgestattet. Alle Anschlüsse sind
verschraubbar. Er unterstützt alle USB Anschlüsse von 1.1 bis 2.0. Durch die externe
Stromversorgung per Netzteil oder PC-Netzteil werden an jedem Port die vollen 500mA
zur Verfügung gestellt. Der serielle USB 2.0 Bus unterstützt optimal die Leistung des
schnellen NEC Chipsatz. Die EX-1166HMV gewährleistet so eine sichere Datenübertra-
gung und exzellente Performance von bis zu 480Mbit pro Sekunde!
BESCHREIBUNG & TECHNISCHE DATEN :
AUFBAU :
Kompatibilität: USB 1.1 & 2.0 Anschluss
Betriebssysteme: WIN 9.x/ME/2000/XP/Server 2003/MAC/Vista/Linux
Anschlüsse: 4 x A-Buchse, 1 x B-Buchse, 1 x 5V Buchse
Lieferumfang: EX-1166HMV, Anleitung, USB Kabel EX-K1552, Netzteil
Zertifikate: CE / FCC / RoHS / WEEE DE97424562 / WHQL
DRIVER INSTALLATION :
JUMPER EINSTELLUNG & ANSCHLÜSSE:
Windows
After the hardware installation Windows will recognize the EX-1177 automatically and
install its drivers.
CHECK INSTALLED DRIVER:
Open the >Device manager< . Now you should see at „USB Devices“ the following new
entry: <USB Root Hub>.
If you see this or a similar information the EX-1177 is installed correctly.
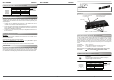
JUMPER SETTING & CONNECTORS:
ACHTUNG !!!
Nur zur Verwendung mit im Lieferumfang enthaltenem Netzteil !!!
Das Netzteil kann an die EX-1166HMV festgeschraubt werden.
5 Volt Buchse:
USB-A-Buchse1-4:
USB 2.0 A-Buchse:
Pin Signal Pin Signal
1 VCC 4 GND
2 DATA-
3 DATA+
Achtung!
Stecker nie umge-
kehrt oder mit
Gewalt einstecken.
Bedienungsanleitung
Bedienungsanleitung
Vers. 1.0/ 16.07.08
Betriebs LED
USB 1-4 4 x Externe USB 2.0 A-Buchse verschraubbar für Endgeräte
5V Buchse für externes Netzteil
verschraubbar
USB B-female:
USB 2.0 B-Connector:
Pin Signal Pin Signal
1 VCC 4 GND
2 DATA-
3 DATA+
Attention!
Never plug in with
force or in wrong
direction.
CLEANING :
For cleaning please use only a dry fluff less cloth and remove the dirt with gently pres-
sure. In the area of the connectors please make sure that no fibres from the cloth re-
main in the connectors. Attention! Never use a moist or wet cloth for cleaning!
USB B-Buchse verschraubbar
zum Computer System