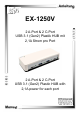
Anleitung EX-1250V 2 A-Port & 2 C-Port USB 3.1 (Gen2) Plastik HUB mit 2,1A Strom pro Port 2 A-Port & 2 C-Port USB 3.1 (Gen2) Plastic HUB with 2,1A power for each port Manual Vers. 1.0 / 15.11.
EX-1250V Inhaltsverzeichnis 1. Beschreibung ······················································································ 3 2. Lieferumfang ······················································································ 3 3. Aufbau, Anschlüsse & LED‘s ································································ 4-5 3.1 Aufbau······································································································ 4 3.
EX-1250V Deutsch 1. Beschreibung Der EX-1250V ist ein USB 3.1 (Gen2) Plastik HUB für bis zu 4 Endgeräte. Der Hub ist mit 2 A-Ports und 2 C-Ports für Endgeräte und 1 C-Port für den Anschluss an den PC ausgestattet. Er unterstützt alle USB Anschlüsse von 1.1 bis 3.1. Jeder Anschluss an der EX1250V ist zusätzlich verschraubbar. Durch die Stromversorgung über den DC Anschluss oder des Terminal Block können an jedem Port 2,1A zur Verfügung gestellt werden.
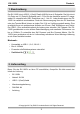
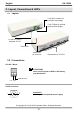
Deutsch EX-1250V 3. Aufbau, Anschlüsse & LED‘s 3.1 Aufbau 7-24V DC Anschluss für beiliegendes Netzteil 7-24V T-Block für optionales externes Netzteil 1x USB 3.1 (Gen2) Upstream C-Buchse Betriebs LED Status LED für jeden Port 4x USB 3.1 (Gen2) Downstream A- & C-Buchse 3.
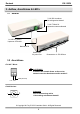
EX-1250V Deutsch 3. Aufbau, Anschlüsse & LED‘s 3.2 Anschlüsse USB 3.1 (Gen2) A-Buchse: Achtung! Stecker niemals umgekehrt oder mit Gewalt einstecken. USB 3.1 (Gen2) C-Buchse: Hinweis! Durch die Doppelbelegung der Pins, kann der USB Typ-C Stecker beidseitig in die Buchse gesteckt werden. 3.3 LED‘s Status LED‘s: LED Status LED Funktion Aus Kein USB Endgerät angeschlossen Langsames Blinken USB 2.0 Modus Schnelles Blinken USB 3.1 (Gen1) Modus Ständig An USB 3.
Deutsch EX-1250V 4. Hardware Installation Beachten Sie bitte die folgenden Installationshinweise. Da es große Unterschiede zwischen PC‘s gibt, können wir Ihnen nur eine generelle Anleitung zum Anschluss der EX1250V geben. Bei Unklarheiten halten Sie sich bitte an die Bedienungsanleitung Ihres Computersystems. 1.
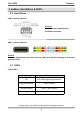
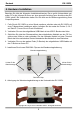
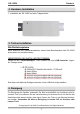
EX-1250V Deutsch 4. Hardware Installation 7. Installation der EX-1250V auf einer Trägerschiene. 5. Treiber Installation Alle Betriebssysteme Nach Abschluss der Hardwareinstallation erkennt das Betriebssystem den EX-1250V automatisch und installiert diesen. ÜBERPRÜFEN DES INSTALLIERTEN TREIBER Öffnen Sie den >Geräte-Manager<. Jetzt müssten Sie unter „USB-Controller“ folgende Einträge sehen: Sind diese oder ähnliche Einträge vorhanden, ist der USB Hub richtig installiert. 6.
Deutsch EX-1250V 7. Technische Daten Chip-Set: VIA Datentransfer-Rate: 10Gbit/s Anschlüsse: 2x USB 3.1(Gen2) A-Buchse, 3x USB 3.1(Gen2) C-Buchse 1x Terminal Block 7-24V, 1x 7-24V DC Anschluss Hardwaresystem: USB 1.1, 2.0, 3.0 & 3.1 Betriebssystem: Alle Betriebssysteme Betriebstemperatur: 0° bis 55° Celsius Lagertemperatur: -20° bis 75° Celsius Rel. Luftfeuchtigkeit: 5% bis 95% Stromversorgung: +7 bis +24 Volt Abmessung: 151,10 x 62,00 x 34,00 mm Gewicht: 420g 8.
EX-1250V English 1. Description The EX-1250V is a plug & play high-speed USB 3.1 (Gen2) plastic hub for 4 USB devices. The EX-1250V provides 2 A-Ports and 2 C-Ports for USB devices and 1 uplink CPort for PC. It supports all USB connections from 1.1 to 3.1. All ports can fix with screw lock. Via a external power supply it is possible to provide a maximum of 2,1A on each USB port. This allows you charging an iPhone, iPad, Smartphone and Tablet.
English EX-1250V 3. Layout, Connections & LED’s 3.1 Layout 7-24V DC Connector for included Power Supply 7-24V T-Block for optional external Power Supply 1x USB 3.1 (Gen2) Upstream C-Port Power LED Status LED for each Port 4x USB 3.1 (Gen2) Downstream A- & C-Port 3.
EX-1250V English 3. Layout, Connections & LED’s 3.2 Connections USB 3.1 (Gen2) A-Port: Attention! Never plug in with force or in wrong direction. USB 3.1 (Gen2) C-Port: Note! By dual assignment of the pins, the USB Type-C plug can be plugged into the port on both sides. 3.3 LED‘s Status LED‘s: LED Status LED Function Off No USB Device connected Slow Flash USB 2.0 Mode Fast Flash USB 3.1 (Gen1) Mode Steady On USB 3.1 (Gen2) Mode © Copyright 2017 by EXSYS Vertriebs GmbH.
English EX-1250V 4. Hardware Installation Because there are large differences between PC’s, we can give you only a general installation guide. Please refer your computer’s reference manual whenever in doubt. 1. If you want to install the EX-1250V on a wall or on a DIN-RAIL, then please go ahead with the steps 5, 6 & 7 on page 12-13 before proceeding to step 2. 2. Now connect the included USB cable to the USB C-Port of the hub. 3.
EX-1250V English 4. Hardware Installation 7. Assemble the EX-1250V on the DIN-RAIL. 5. Driver Installation All Operating Systems After the hardware installation the OS will recognize the device automatically and install the drivers. CHECK INSTALLED DRIVER Open the >Device manager<. Now you should see at „USB-Controller“ the following new entry's: If you see this or a similar information the device is installed correctly. 6.
English EX-1250V 7. Technical Information Chip-Set: VIA Data Transfer Rate: 10Gbit/s Connectors: 2x USB 3.1(Gen2) A-Port, 3x USB 3.1(Gen2) C-Port 1x Terminal Block 7-24V, 1x 7-24V DC Connector Hardware System: USB 1.1, 2.0, 3.0 & 3.1 Operating System: All Operating Systems Operating Temperature: 32°F to 131°Fahrenheit Storage Temperature: -20°F to 167°Fahrenheit Rel. Humidity: 5% to 95% Power: +7 to +24 Volt Size: 151,10 x 62,00 x 34,00 mm Weight: 420g 8.