
User manual


15
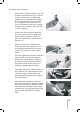
To attach the H-clamp:
1. Screw the H-clamp’s boom into the
chosen microphone’s clip or shock
mount, ensuring it is tightened
sufficiently to prevent the weight
of the microphone from causing
it to untighten (if necessary, re
move the boom from the H-clamp
temporarily to twist it into the clip
/ mount tightly).
2. Select the most obvious position
on your instrument for attaching
the H-clamp (see the notes for
your own particular instrument in
Section 4).
3. Ensure the boom is being held
firmly by the boom gip (so it will
not swing around while you posi-
tion the H-clamp on your instru-
ment).
4. Use the tightening screw under the
bottom disk to open the gap be-
tween the clamp disks so that it
is slightly wider than the width of
the instrument at the point you
intend to attach the H-clamp.
5. Carefully slip the H-clamp disks ei-
ther side of the instrument’s body
until the stalks of the disks are
pressed gently against the edge of
the instrument.
6. Orientate the clamp so that the
boom will be held in approximately
the right position in relation to the
instrument and tighten the clamp
carefully by turning the tightening
screw under the bottom clamp
disk.