
Owner's Manual

7 — English
STARTING/STOPPING THE POWER HEAD
See Figure 5.
To start:
Press and hold the trigger lock-out.
Depress the switch trigger.
To stop:
Release the switch trigger to stop the power head.
Upon release of the switch trigger, the trigger lock-out
will automatically reset to the locked position.
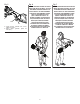
OPERATING THE POWER HEAD
See Figures 6 - 7.
Hold the power head with your right hand on the rear handle
and your left hand on the front handle. Keep a firm grip with
both hands while in operation. Power head should be held at
a comfortable position with the rear handle about hip height.
NOTE: The most common operating positions are shown in
the figures referenced. For the operating position for your
specific attachment, always refer to the operator’s manual
that came with the attachment.
Always operate power head with switch trigger completely
depressed. If debris becomes wrapped around the attach-
ment, RELEASE THE SWITCH TRIGGER, remove the battery
pack, and remove the debris.
WARNING:
Always hold the power head away from the body keeping
clearance between the body and the tool. Any contact
with an attachment cutting head can result in burns and/
or other serious personal injury.
WARNING:
Extreme care must be taken when using a blade attach-
ment to ensure safe operation. Read the safety informa-
tion for safe operation when using a blade attachment
and refer to the safety rules and instructions in your at-
tachment manual. Never use a brush cutter attachment
with this power head. Improper operation of a blade or
any attachment could result in serious injury.
NOTICE:
Before each use, inspect the entire product for damaged,
missing, or loose parts such as screws, nuts, bolts, caps,
etc. Tighten securely all fasteners and caps and do not
operate this product until all missing or damaged parts
are replaced. Please contact customer service or an
authorized service center for assistance.
WARNING:
Always remove battery pack from your tool when you are
assembling parts, making adjustments, cleaning, or when
not in use. Removing battery pack will prevent accidental
starting that could cause serious personal injury.
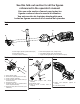
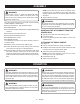
INSTALLING/REMOVING BATTERY PACK
See Figure 4.
To install battery pack:
Place the battery pack in the power head. Align raised
ribs on battery pack with grooves in the power head’s
battery port.
WARNING:
Make sure the latch on the bottom of the battery pack
snaps in place and the battery pack is fully seated and
secure in the power head battery port before beginning
operation. Failure to securely seat the battery pack could
cause the battery pack to fall out, resulting in serious
personal injury.
To remove battery pack:
Press and hold the battery latch button at the bottom of
the battery pack.
Remove battery pack from the power head.
For complete charging instructions, refer to the Operator’s
Manuals for your RYOBI battery pack and charger models.
WARNING:
To avoid serious personal injury, always remove the bat-
tery pack and keep hands clear of the trigger lock-out
when carrying or transporting the tool.
OPERATION