Portable CD-ROM Installation Manual ThinCD Series For Parallel & PCMCIA
CONTENTS PRECAUTIONS ..................................................................................... 1 PART NAMES AND FUNCTIONS............................................................... 3 FRONT PANEL .................................................................................... 3 REAR PANEL ..................................................................................... 4 POWER SOURCE .....................................................................................
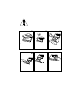
PRECAUTIONS READ THIS SECTION CAREFULLY BEFORE STARTING TO USE THE PORTABLE CDROM. ý ý ý Ÿ Do not expose the drive Ÿ Do not place heavy objects on the drive. to direct sunlight or heat. Do not leave it in a hot automobile. Ÿ Do not spill liquid on þ þ ý Ÿ Clean the lens with a Ÿ Do not touch the lens. dry cotton swab or compressed air. to protect it from dust. -3- the unit. Ÿ Clean the outside of the player with a soft, dry cloth.
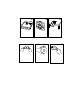
ý Ÿ Do not shake or subject to intense vibration. ý Ÿ Keep the drive away Ÿ Do not put the drive in a place subject to weight and pressure. ý from the edge of the desk or table ý þ Ÿ Handle the disc by the Ÿ Do not bend the disc. ý edges as much as possible. Ÿ Do not touch the signal side of the disc. Do not attach labels to the disc. • Condensation can form on the lens if the CD-ROM drive is moved from a cold temperature to a warmer environment.
PART NAMES AND FUNCTIONS FRONT PANEL The front panel of your CD-ROM may look slightly different from the figure shown below. The important parts and functions, however, are the same regardless their locations. 1. Eject button: Press this button to eject the tray. 2. Access LED: This LED will blink when the drive is accessing the disc. 3. Emergency Hole: Insert a pin shaped item to manually eject the tray in case of power-off. 4. Power LED: This LED will light when power is on.
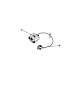
REAR PANEL 1. Power Button: Press the button to manually power on/off the drive when it is powered by an AC adapter. 2. DC in Jack: This jack connects to the AC adapter. 3. Power Source Switch: This switch is used to select the power source. When the Switch is set to “PC”, then PCMCIA power direct is selected. When it is set to “DC”, an AC adapter is required to power the CD-ROM. 4. Interface Connector: Connect the drive to the PCMCIA interface card or Parallel interface cable. 5.
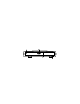
PARALLEL PORT ADAPTER CABLE: • Parallel port connector: Connect this connector to a computer (25 pin) parallel port (Printer port). ‚ CD-ROM drive connector: Connect this connector to the back of CD-ROM drive (26 pin) Figure 3 POWER SOURCE PC Card (PCMCIA) interface The portable CD-ROM drive can be powered either by an AC adapter or directly from the computer via the PCMCIA socket. Parallel Port interface The portable CD-ROM drive can be powered by an AC adapter only.
supply enough power to operate the CD-ROM drive, you must use the external power as described below. When the POWER SOURCE SWITCH is set to “DC” as Figure B shows external power is selected, and an AC adapter is required. POWER DIRECT FROM PCMCIA SOCKET 1. Set the power source switch in “PC” position. 2. Plug the PCMCIA card and go. CAUTION To select direct power from PCMCIA socket of the computer while using the PCMCIA CD-ROM, your computer must have enough energy to power the PCMCIA CD-ROM.
INSTALLATION The installation procedures have two sections for each type of interface. 1. PC Card (PCMCIA) interface 2. Parallel Port interface The procedure includes hardware and software installation. Just follow along the interface of your choice. INSTALLATION FOR PCMCIA INTERFACE HARDWARE INSTALLATION Power off your system before connecting the Portable CD-ROM to your computer. 1. Connect the PCMCIA interface card to the CD-ROM drive.
SOFTWARE INSTALLATION SOFTWARE INSTALLATION FOR WINDOWS 95/98 If you are inserting the PCMCIA card into your computer for the very first time, depend on version of Windows 95/98. We list all the screen display for your reference. Windows 98 Add New Hardware Wizard will be displayed Click “Next” twice to show the screen below. Windows will search for a driver, make sure the ‘Floppy disk drive’ is checked and the ‘Specify a location’ show A:\win95 also checked.
Windows 95 (B) If the “Update Device Driver Wizard” dialog box appears as below, it means your Windows 95 is version 4.00.950B, i.e. OSR 2. In this case, perform the following steps for installing the Portable CDROM under Windows 95. Otherwise, ignore and skip this section and read the next section for installing the PCMCIA CD-ROM for Windows 95. (Older version) 1. Insert the Portable CD-ROM device driver disk into your floppy drive. 2. Click the Next button. 3. Click the Finish button.
Windows 95 (Older Versions) The following dialog will appear. If you are using the Portable CD-ROM under Windows 95 for the very first time and your Windows 95 is version 4.00.950 or 4.00.950a, (If the dialog box does not appear and the CD-ROM folder can not be found in ‘My Computer’, please refer to the section titled “Enabling 32-bit Card Support”.) Select “Driver from disk provided by hardware manufacturer” and click the OK button.
Enabling 32-bit Card Support Your system should be ready for PCMCIA socket support prior to operating the Portable CD-ROM. To check whether your computer has the PCMCIA Socket supported, first, double-click on the “System” icon from the “Control Panel” folder (you can select the “Control Panel” under “Settings” from the “Start” menu to open the “Control Panel” folder). Click on the Device Manager Tab.
After the PCMCIA 32-bit Card Support is installed, Windows will ask you to reboot your computer. You should now refer to the previous section for installing the PCMCIA CD-ROM device driver. If the PCMCIA Socket is not found, then you must add a PCMCIA socket to your system. Please click on the “Adding New Hardware” icon in the Control Panel folder and select “PCMCIA socket”. Select the appropriate type of PCMCIA Controller that matches yours and follow the on-screen instructions.
SOFTWARE INSTALLATION FOR WINDOWS NT Before You Begin ♦ Be sure the Windows NT you are to install is version 3.51 or higher. ♦ Since Windows NT does not support the “Hot Insert/Remove” feature, the Portable CD-ROM should be connected with your computer prior to starting Windows NT. Likewise, do not remove the Portable CDROM before you shut down Windows NT. ♦ In Windows NT, the I/O and IRQ settings of Portable CD-ROM can not be changed.
Click “Add” button, and click “Have Disk...” button. Windows NT will then prompt you to insert the manufacturer installation disk. Insert the device driver disk into your floppy drive. Specify the directory as A:\WINNT (or B:\WINNT whichever contains the diskette) and select OK. When the following dialog box appears, select the PCMCIA CD-ROM/CDR/CD-RW/DVD-ROM and click the OK button. Follow the on-screen instruction to continue.
INSTALLATION FOR PARALLEL PORT INTERFACE HARDWARE INSTALLATION Before you begin, make sure you turn OFF all power to your system before connecting the Portable CD-ROM to your computer. 1. Set the POWER SOURCE SWITCH to DC. 2. Connect the DC Output from the adapter to DC-IN. 3. Connect one end of the Parallel cable to Portable CD-ROM (26 pin small connector), and connect the other end to computer parallel port.
4. Plug-in the AC adapter to a working AC receptacle. Turn on the Portable CD-ROM power before your turn on PC power. NOTE: Always, turn the Portable CD-ROM power on first.
SOFTWARE INSTALLATION FOR WINDOWS 95/98 Check all the connection as stated in the “Hardware Installation” section. From the Desktop Click ‘My Computer’ icon, ‘Control Panel’ and then ‘Add New Hardware’ 1. Click "Next>" to begin. 2. When prompted whether to search for your new hardware, Select "No" and click "Next>".
3. Open "SCSI controllers". Click "Have Disk...". 4. Insert Installation Diskette into the drive selected, then click "OK". If you're installing from a directory containing downloaded installation files, specify the full path of the directory and click "OK". 5. Select "PHT. Parallel-Port PHT-Series Win95 Driver", and click "Next>". 6. Click "Finish" to complete installation. 7. Remove Installation diskette. 8. Restart system, when prompted.
INSTALLING THE PCMCIA CD-ROM FOR WINDOWS NT In Windows NT 4.0, you may select “Control Panel” under “Settings” from the “Start” menu to open the “Control Panel” folder. double click the “SCSI Adapter” icon) Click “Drivers” tab, and a figure illustrated as below will be displayed. Click “Add” button, and click “Have Disk...” button. Windows NT will then prompt you to insert the manufacturer installation disk. Insert the device driver disk into your floppy drive.
Click OK to select the driver. Follow the on-screen instruction to continue. After finishing, Windows NT will prompt you to restart your computer to activate the new device driver for Windows NT.
USING THE PCMCIA CD-ROM BASIC OPERATING PROCEDURE 1. Make sure there is power to your drive. 2. Push gently but firmly, the eject button on the front panel to open the tray. The tray will come out a short distance of about 2.5 cm. 3. Hold down the drive and gently pull the tray out until a disc can be loaded. 4. Place the disc into the tray with the label side up. Align the hole in the center of the disc snapped onto the raised circle in the center of the tray.
5. Hold down the drive and gently push the panel to close the tray. 6. Wait for a few seconds before the disc is ready to be accessed. 7. To remove a disc from the tray, press down on the holder’s center while lifting out the disc by its edge. Note: Keep the CD-ROM drive away from the edges of desk or table to avoid accidentally dropping the drive.
Playing an Audio CD by CD player Utility in Windows 95 1. Connect the 3.5mm stereo audio cable from the Line-Out Jack of your CD-ROM to your notebook’s Line-In Jack or to an self-amplified speaker. 2. Make sure the CD Player utility has been installed in your Windows 95. If not, please go to My Computer\Control Panel\Add/Remove programs and click the Windows Setup\Multimedia to add the CD Player utility. 3. Place an Audio CD in your CD-ROM. 4. The CD Player will then automatically play the audio CD.
To display the PC card indicator on the task bar, perform the following steps, 1. Double-click the PC Card (PCMCIA) icon on the Control Panel. 2. Make sure the box showing the control on the task bar is checked. If the PC Card (PCMCIA) wizard appears when you click the button in step 1, follow the instructions. Restart your computer, then double-click the PC Card (PCMCIA) icon in the Control Panel, and check the box to view the status indicator on the task bar.
APPENDIX A IF SOMETHING GOES WRONG Following are the solutions for some of the problems you may encounter while using the Portable CD-ROM. NOT ABLE TO ACCESS A DISC IN THE DRIVE Solutions: v Make sure there’s power to your drive. If you are using power direct from the PCMCIA socket, be sure that your system has enough power. Otherwise, you will need an AC adapter to power the drive. v Make sure the tray has been closed properly. Press gently and firmly until it clicks into place.
APPENDIX B SOFTWARE INSTALLATION FOR DOS PCMCIA Interface Automatic Installation The INSTALL program helps you install the device driver into your computer easily. Please follow the instructions below to proceed with automatic installation. 1. Insert the device driver diskette into a floppy disk drive on your computer. 2. Change the working directory to the floppy drive containing the device driver diskette by typing “A:” or “B:” then press ENTER. 3.
Manual Installation You may also manually install the Portable CD-ROM device driver if the default setting conflicts with your system. Please follow procedures below to complete this manual installation. 1. Copy the files EXPCDI.EXE from the Portable CD-ROM device driver disk to your hard disk. 2. Copy or locate the MSCDEX.EXE in your hard disk. Usually reside at C:\DOS or C:\WINDOWS\COMMAND 3. Add “LASTDRIVE=Z” to the TOP of your CONFIG.SYS file.
5. The example above shows the default setting. The /D: switch indicates the device name. It MUST be the same name as you specified by the /D: switch of EXPCDI.EXE in your CONFIG.SYS file. The /M: switch indicates how much memory to allocate for caching information on the CD-ROM. The default /M:4 caches 8KB. For more information about the switches of MSCDEX, please type “help MSCDEX” at the DOS prompt. Now, reboot your computer to activate the CD-ROM drive.
video card. Refer to the side of the CD-ROM package for program requirements, and enjoy! Access TransCD without Software Installation (Dynamic loading of the TransCD driver) This method of Dynamically Loading the TransCD driver offers a temporary install of the TransCD driver. It will not modify CONFIG.SYS and AUTOEXEC.BAT files. The driver is loaded dynamically. When the system is shut off, the driver is gone. 1. Place your TransCD installation diskette into the floppy drive. 2.