CONTENTS PRECAUTIONS ..................................................................................... 1 PART NAMES AND FUNCTIONS............................................................... 3 FRONT PANEL .................................................................................... 3 REAR PANEL ..................................................................................... 4 PC CARD SELECTING THE POWER SOURCE...................................................
CONTENT PART NAMES AND FUNCTIONS ..................................... 7 FRONT PANEL.......................................................................................7 REAR PANEL .........................................................................................8 POWER SOURCE................................................................ 9 POWER DIRECT FROM PCMCIA SOCKET .......................................9 POWER FROM THE AC ADAPTER ....................................................
If something goes wrong ..................................................... 27 Can not access a DISC in the drive .......................................................27 THE Tray does not slide out..................................................................27 Some cd run correctly but others do not ...............................................
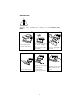
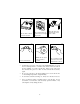
PRECAUTIONS Read this section carefully before starting to use the PCMCIA DVDROM. ý ý ý Ÿ Do not expose the drive Ÿ Do not place heavy objects on the drive. to direct sunlight or heat. Do not leave it in a hot automobile. Ÿ Do not spill liquid on þ þ ý Ÿ Clean the lens with a Ÿ Do not touch the lens. dry cotton swab or compressed air. to protect it from dust. -5- the unit. Ÿ Clean the outside of the player with a soft, dry cloth.
ý Ÿ Do not shake or subject to intense vibration. ý Ÿ Keep the drive away Ÿ Do not put the drive in a place subject to weight and pressure. ý from the edge of the desk or table ý þ Ÿ Handle the disc by the Ÿ Do not bend the disc. ý edges as much as possible. Ÿ Do not touch the signal side of the disc. Do not attach labels to the disc. • Condensation can form on the lens if the DVD-ROM drive is moved from a cold temperature to a warmer environment.
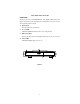
PART NAMES AND FUNCTIONS FRONT PANEL The front panel of your DVD-ROM may look slightly different from the figure shown below. The important parts and functions, however, are the same regardless their locations. 1. Eject button: Press this button to eject the tray. 2. Access LED: This LED will blink when the drive is accessing the disc. 3. Emergency Hole: Insert a pin shaped item to manually eject the tray in case of power-off. 4. Power LED: This LED will light when power is on.
REAR PANEL 1. Power Button: Press the button to manually power on/off the drive when it is powered by an AC adapter. 2. DC in Jack: This jack connects to the AC adapter. 3. Power Source Switch: This switch is used to select the power source. When the Switch is set to “PC”, then PCMCIA power direct is selected. When it is set to “DC”, an AC adapter is required to power the DVD-ROM. 4. PCMCIA Interface Connector: Connect the drive to the PCMCIA interface card. 5.
POWER SOURCE The PCMCIA DVD-ROM Drive can be powered either by an AC adapter or directly from the computer via the PCMCIA socket. The POWER LED indicates the power status. It always light up when the power supply is in the normal condition. SELECTING THE POWER SOURCE The POWER SOURCE SWITCH (as shown in 3 of Figure 2) is used for selecting the power source.
3. Attach the AC adapter to the AC power outlet. 4. Insert the PCMCIA card and the unit now ready. CAUTION Use only the AC adapter provided with this unit. Using the incorrect AC adapter may cause permanent and unpredictable damage to the PCMCIA DVD-ROM.
HARDWARE INSTALLATION Power off your system before connecting the PCMCIA DVD-ROM to your computer. 1. Connect the PCMCIA interface card to the DVD-ROM drive. Press firmly until the connector is seated, and tighten the two screws on the cable connector. 2. Place the drive in a horizontal position. The drive is designed to operate only in a horizontal position. Operating the drive in any abnormal position is not recommended. 3.
SOFTWARE INSTALLATION SOFTWARE INSTALLATION FOR WINDOWS 95/98 If you are inserting the PCMCIA DVD-ROM into your computer for the very first time, depend on version of Windows 95/98. We list all the screen display for your reference. Windows 98 Add New Hardware Wizard will be displayed Click “Next” twice to show the screen below. Windows will search for a driver, make sure the ‘Floppy disk drive’ is checked and the ‘Specify a location’ show A:\win95 also checked.
Windows 95 (B) If the “Update Device Driver Wizard” dialog box appears as below, it means your Windows 95 is version 4.00.950B, i.e. OSR 2. In this case, perform the following steps for installing the PCMCIA DVDROM under Windows 95. Otherwise, ignore and skip this section and read the next section for installing the PCMCIA DVD-ROM for Windows 95. (Older version) 1. Insert the PCMCIA DVD-ROM device driver disk into the floppy drive. 2. Click the Next button. 3. Click the Finish button.
Windows 95 (Older Versions) The following dialog will appear. If you are using the PCMCIA DVDROM under Windows 95 for the very first time and your Windows 95 is version 4.00.950 or 4.00.950a. (If the dialog box does not appear and the DVD-ROM folder can not be found in ‘My Computer’, please refer to the section titled “Enabling 32-bit Card Support”.) Select “Driver from disk provided by hardware manufacturer” and click the OK button.
Enabling 32-bit Card Support Note: The following procedures apply to the notebook that has install or re-install the original release of the Windows 95 version 4.00.950 or 4.00.950a. Your system should be ready for PCMCIA socket support prior to operating the PCMCIA DVD-ROM.
After the PCMCIA 32-bit Card Support is installed, Windows will ask you to reboot your computer. You should now refer to the previous section for installing the PCMCIA DVD-ROM device driver. If the PCMCIA Socket is not found, then you must add a PCMCIA socket to your system. Please click on the “Adding New Hardware” icon in the Control Panel folder and select “PCMCIA socket”. Select the appropriate type of PCMCIA Controller that matches yours and follow the on-screen instructions.
SOFTWARE INSTALLATION FOR WINDOWS NT Before You Begin ♦ Be sure the Windows NT you are to install is version 3.51 or higher. ♦ Since Windows NT does not support the “Hot Insert/Remove” feature, the PCMCIA DVD-ROM should be connected with your computer prior to starting Windows NT. Likewise, do not remove the PCMCIA DVD-ROM before you shut down Windows NT. ♦ In Windows NT, the I/O and IRQ settings of PCMCIA DVD-ROM can not be changed.
Click “Add” button, and click “Have Disk...” button. Windows NT will then prompt you to insert the manufacturer installation disk. Insert the device driver disk into your floppy drive. Specify the directory as A:\WINNT (or B:\WINNT whichever contains the diskette) and select OK. When the following dialog box appears, select the PCMCIA DVDROM/CD-R/CD-RW/DVD-ROM and click the OK button. Follow the on-screen instruction to continue.
USING THE PCMCIA DVD-ROM BASIC OPERATING PROCEDURE 1. Make sure there is power to your drive. 2. Push gently but firmly, the eject button on the front panel to open the tray. The tray will come out a short distance of about 2.5 cm. 3. Hold down the drive and gently pull the tray out until a disc can be loaded. 4. Place the disc into the tray with the label side up. Align the hole in the center of the disc snapped onto the raised circle in the center of the tray.
5. Hold down the drive and gently push the panel to close the tray. 6. Wait for a few seconds before the disc is ready to be accessed. 7. To remove a disc from the tray, press down on the holder’s center while lifting out the disc by its edge. Note: Keep the DVD-ROM drive away from the edges of desk or table to avoid accidentally dropping the drive.
PLAYING A MOVIE USING THE PCMCIA DVD-ROM CARD AND POWERDVD PROGRAM. System requirement • • • • Windows 95 OSR2 or Windows 98 operating system ONLY Pentium MMX 233 Mhz is a minimum requirement (Pentium II 266 Mhz is recommended) 32 MB DRAM (Synchronized DRAM recommended) CardBus Controller with DMA support To check if your PCMCIA controller is a CardBus controller and also has DMA support, Click on: “Start”, >“Setting”, >“Control Panel”,>”System” then “Device Manger” tab the screen below will display.
Installing and using PowerDVD PowerDVD is a playback program for DVD titles or MPEG-2 files. To install and use PowerDVD, follow the procedures below. 1. 2. 3. 4. Prior to installing the PowerDVD, the PCMCIA DVD-ROM should be installed beforehand. Refer to the PCMCIA DVD-ROM installation procedure in this manual for details. Verify if the notebook has additional CD-ROM drive icon in “My Computer” You may have to restart the computer after the installation is completed to activate the DVD-ROM.
About Video Playback Setup The PowerDVD employs three video modes: 1. Auto-Select (Default) 2. Force Bob 3. Force Weave Click on to change the system configuration. For a notebook with slower CPU that is not meet our recommended criteria (Pentium II 266MHz), you may select Force Bob mode to get better playback result. It is recommended that you check the option Auto-Select and PowerDVD will automatically determine the best video mode for you.
USING THE PCMCIA DVD-ROM CARD WITH THE MPEG-2 DECODER CARD. Windows 95/98 only If you are using the PCMCIA DVD-ROM with MPEG-2 card such as MARGI PCMCIA card, you should follow the instruction below: 1. 2. 3. 4. 5. 6. Verify if the DVD-ROM install properly and try to read a DVD or CDROM disk. Insert the MPEG-2 card, this will start the Plug-and-Play device driver installation procedure for Windows 95/98. Provide the installation diskette for the MPEG-2 card when prompted.
PLAYING AN AUDIO CD USING CD PLAYER UTILITY IN WINDOWS 95/98. 1. Connect the 3.5mm stereo audio cable from the Line-Out Jack of your DVD-ROM to your notebook’s Line-In Jack or to an self-amplified speaker. 2. Make sure the CD Player utility has been installed in your Windows 95/98. If not, please go to “My Computer” > “Control Panel” > “Add/Remove Programs” and click the Windows Setup Tab then select “Multimedia” to add the CD Player utility. 3. Place an Audio CD in your DVD-ROM. 4.
To display the PC card indicator on the task bar, perform the following steps, 1. Double-click the PC Card (PCMCIA) icon on the Control Panel. 2. Make sure the box showing the control on the task bar is checked. If the PC Card (PCMCIA) wizard appears when you click the button in step 1, follow the instructions. Restart your computer, then double-click the PC Card (PCMCIA) icon in the Control Panel, and check the box to view the status indicator on the task bar.
IF SOMETHING GOES WRONG Following are the solutions for some of the problems you may encounter while using the PCMCIA DVD-ROM. CAN NOT ACCESS A DISC IN THE DRIVE Solutions: v Make sure there’s power to your drive. If you are using power direct from the PCMCIA socket, be sure that your system has enough power. Otherwise, you will need an AC adapter to power the drive. v Make sure the tray has been closed properly. Press gently and firmly until it clicks into place.
EXP Computer, Inc. EXP Memory Products. Non-transferable Limited Warranty EXP Computer Inc., and EXP Memory Products ("EXP") warrants that the DVD-785 (“products”) manufactured or distributed by EXP to be free from failures due to defects in materials or workmanship for a full one year from the date of purchase of the products. This warranty is void if the product is damaged by abnormal or improper use or by accident, abuse or if any attempt to repair or modify the product without authorization from EXP.