
User`s guide


CUEMIX CONSOLE
74
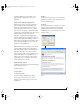
PREAMP GAIN, PAD, REFERENCE LEVEL AND
+6DB BOOST
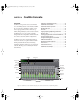
The preamp gain, pad, reference level and +6dB
boost settings at the very top of the CueMix
Console window (Figure 10-1) affect each input
globally, across all mixes and for audio being
routed to the computer. For example, if you add
6dB of boost, your host software will receive the
boost for that input as well.
Preamp gain
This setting (Figure 10-1) adjusts preamp gain, just
like the four trim knobs on the front panel of the
Tr a v e l e r.
Pad
These buttons (Figure 10-1) toggle the pad for each
mic input. Clicking these buttons is the same as
pushing the trim knobs on the front panel.
Boost
This setting (Figure 10-1) adds 6 dB of gain to the
input signal. This setting is applied globally for the
input.
+4/-10 reference level
Click the reference button to toggle between these
two standard reference levels. This setting is
applied globally for the input pair.
SAVING AND LOADING PRESETS
As explained earlier in “Save/Name Preset” on
page 47, the Traveler can store up to 16 presets in its
on-board memory. A preset includes of all CueMix
DSP settings for all four mix busses, but it excludes
global settings like clock source and sample rate.
The Load Preset and Save Preset commands in the
CueMix Console File menu let you name, save and
load presets in the Traveler.
SAVING AND LOADING PRESETS TO/FROM
DISK
The Save and Load commands in the CueMix
Console File menu allow you to save Traveler
presets to and from your hard drive. This allows
you to save an unlimited number of Traveler
presets on disk. (Use the Load Preset and Save
Preset commands to get presets from — and save
them to — the Traveler itself.) Click the Save
button to save the current configuration; click the
Load button to open an existing configuration that
you have previously saved on disk.
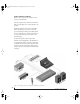
TALKBACK AND LISTENBACK
CueMix Console provides Ta l kb a c k and Listenback
buttons. Talkback allows an engineer in the control
room to temporarily dim all audio and talk to
musicians in the live room. Conversely, Listenback
allows musicians to talk to the control room.
Hardware setup
Figure 10-2 below shows a typical hardware setup
for Talkback and Listenback. For Talkback, set up a
dedicated mic in your control room and connect it
to a mic input on your MOTU FireWire audio
interface. For Listenback, set up a dedicated
listenback mic in the live room for the musicians
and connect it to another mic input. For talkback
output, set up a headphone distribution amp or set
of speakers in the live room, and connect it to a pair
of outputs. For example, you might connect a
headphone distribution amp to analog outputs 7-8
on your MOTU Firewire audio interface, as
demonstrated below in Figure 10-2 on page 75.
!Traveler Manual/Win Page 74 Monday, November 29, 2004 3:50 PM