
User`s guide


CUBASE, NUENDO AND OTHER ASIO SOFTWARE
53
Optical input and output
To ma ke a Trave le r optical input or output available
in Cubase, choose the appropriate format (ADAT
optical or TOSLink) from the optical input and/or
output menu. If you won’t be using the optical
connectors, turn them off.
Phones
This Traveler setting lets you choose what you’ll
hear from the headphone jack. For example, if you
choose Analog 1-2, the headphones will duplicate
the main outs. Or you can choose any other output
pair. If you choose Phones, this setting makes the
headphone jack serve as its own independent
output pair. As a result, you’ll see Phones 1-2 as an
additional audio destination in Cubase’s audio
output menus.
CHOOSING THE MOTU FIREWIRE ASIO
DRIVER
Once you’ve made the preparations described so
far in this chapter, you’re ready to run your audio
software and enable the MOTU FireWire ASIO
driver. Check the audio system or audio hardware
configuration window in your software. There will
be a menu there that lets you choose among
various ASIO drivers that may be in your system.
Choose the MOTU FireWire ASIO driver from this
menu.
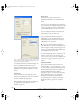
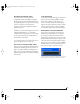
Nuendo and Cubase SX
To ac t iv at e t he Tr aveler driver in Nuendo or Cubase
SX, go to the Device Setup window, click VST
Audiobay and choose MOTU FireWire Audio from
the Master ASIO Driver menu as shown below.
Make the other settings in the dialog as need for
your system and synchronization scenario.
Figure 7-2: Activating the Traveler FireWire ASIO driver in Nuendo and
Cubase.
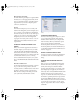
ASIO DIRECT MONITORING
The Direct Monitoring option (Figure 7-2) allows
you to monitor inputs directly in the Traveler
hardware with no drain on your computer and
near zero latency. When you enable this option,
Cubase uses the Traveler’s CueMix DSP
monitoring features whenever you use Cubase’s
monitoring features. For further information, see
“Controlling CueMix DSP from within Cubase or
Nuendo” on page 69.
OTHER SYSTEM DIALOG SETTINGS
Consult your Cubase or Nuendo documentation
for details about the rest of the settings in this
dialog.
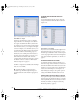
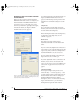
VIEWING AND MANAGING TRAVELER
INPUTS
Once you’ve chosen the MOTU FireWire Audio
driver in the Audio System dialog as explained
earlier, click VST Inputs beneath the MOTU
FireWire Audio item (Figure 7-3). The list on the
right displays inputs supplied by the Traveler, as
well as any other connected MOTU FireWire audio
interfaces. If the list does not match what you
expect to see, click the Reset button. If you don’t see
the Traveler’s optical inputs and/or outputs in the
list, check the MOTU FireWire Audio Console to
make sure they are turned on and set to the format
you require. If you don’t plan to use the optical
input or output, turn it off to conserve computer
bandwidth.
!Traveler Manual/Win Page 53 Monday, November 29, 2004 3:50 PM