
Technical data


Cash Register Express
Page 10
10 Steps to Getting Started
Step 6 – Configure Your Inventory and Function Buttons
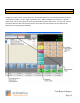
The invoice screen, where sales are ring up is a highly customizable screen. By default, inventory
items are displayed in the order you add them. The buttons are added to the screen using a default
color.
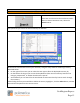
To change the look of your invoice screen, and configure function buttons and best sellers, select the
Manager Button on the top right of the Login Screen and enter a username and password (default
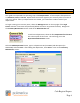
username: 01, password: admin). Navigate to the Touch Screen Configuration screen inside of the
Setup tab and go to the Items & Departments tab.
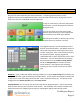
The functions in the Items & Departments
tab are used to change the order, color,
caption and picture of your menu buttons.
You can also choose to make certain items or
departments invisible.
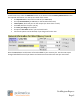
To change the color of a department or
menu item button, select the
department (in the left list) or menu item
(in the right list) and select the Select
Color button.
Change the order of your departments or
menu items by selecting them from the
list and using the Up or Down buttons.
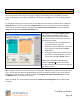
When you are finished making changes,
select the Save & Exit button. Your saved
changes will display the next time you log into
the invoice screen.
TIP: Changes made to the inventory screen on one terminal automatically update ALL terminals in real
time. You do have the ability to design different screens for specific terminals in your store without
affecting the other terminals. To do this, select the Configure This Station Individually option from
the Options menu on the top of the screen.
If this is checked, any layout changes made within Touch Screen Configuration will not affect other
terminals.